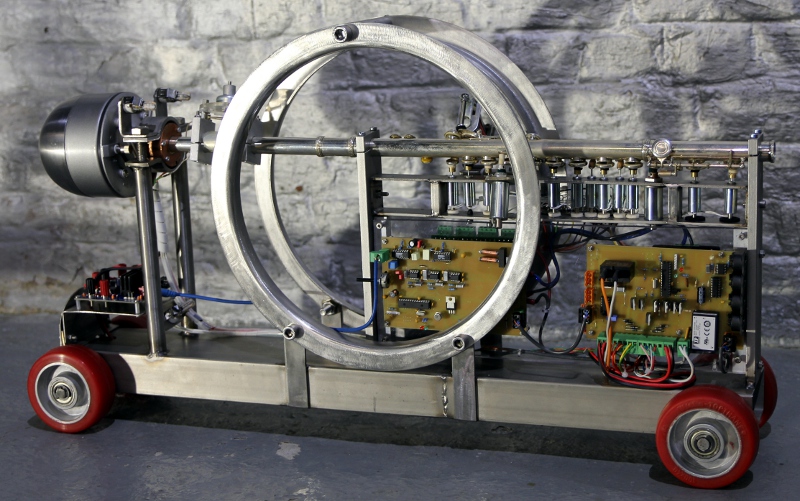
|
Microtonal Musical Robot Flanders Robotics |
|
<Flut>
an automated extended flute Godfried-Willem RAES 2020 |
|
Microtonal Musical Robot Flanders Robotics |
|
<Flut>
an automated extended flute Godfried-Willem RAES 2020 |
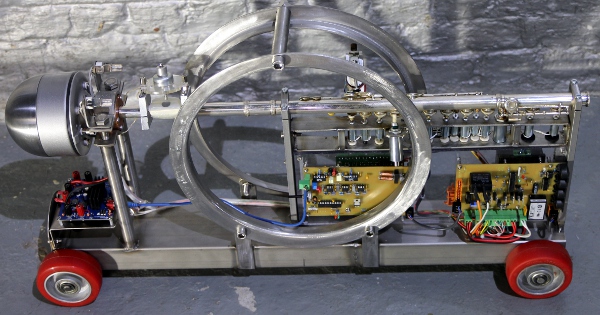
Robot: <Flut>
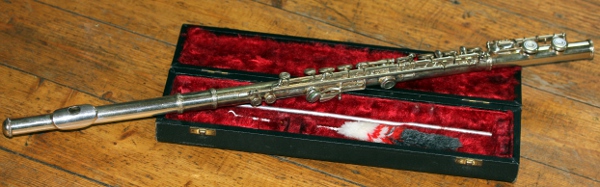
The design and construction of this automated instrument started with a birthday present I got from one of my collaborators, Lara Van Wynsberghe: an Italian made flute, in reasonably good shape. It's an instrument made by Rampone & Cazzani. The nameplate mentions FISM, Milano. The serial number is 861 and we date it from before 1957 and after 1910. The tuning conforms to A= 440Hz.
For the automation of this instrument we started off by performing three experiments in order to select a suitable method for the excitation of the flute:
1.- We can use a compressor -equiped with a fast responding wind valve- to
generate the required wind jet. A oval slit was made (in latex) to project the
jet on the lip plate of the flute, modelling the way humans play flutes.  Experimenting
very soon revealed that the angle under which the jet hits the lip plate should
be variable to adjust intonation. Also the distance between the jet exhaust
and the lip plate ought to be a function of the pitch to be produced. The higher
the pitch, the shorter the distance should be. In total four degrees of freedom
for the required movements proved to be required. Thus an implementation of
this human-modelled way of sounding the flute, requires two stepping motors,
one fast response valve and a fast responding variable pressure compressor.
This gets very complicated and clearly impossible if we want to get all this
functioning fast and in silence... Many other automated instrument builders
before me, went this way: from Martin Riches in the seventies up to Peter Wiessenthaner
recently. The latters construction is shown here in a pic he posted on Facebook:
Experimenting
very soon revealed that the angle under which the jet hits the lip plate should
be variable to adjust intonation. Also the distance between the jet exhaust
and the lip plate ought to be a function of the pitch to be produced. The higher
the pitch, the shorter the distance should be. In total four degrees of freedom
for the required movements proved to be required. Thus an implementation of
this human-modelled way of sounding the flute, requires two stepping motors,
one fast response valve and a fast responding variable pressure compressor.
This gets very complicated and clearly impossible if we want to get all this
functioning fast and in silence... Many other automated instrument builders
before me, went this way: from Martin Riches in the seventies up to Peter Wiessenthaner
recently. The latters construction is shown here in a pic he posted on Facebook:
2.- We can call in the recipe applied to earlier robots such as <Bono>, <Ob> or <Bug> by using a membrane compressor to create a pulsating air jet oriented on the lip plate. We tried this out using a specially designed acoustic impedance convertor with an oval slit. The sound was at the most acceptable, but sounding quite artificial and electronic. Obviously a result of the fact that the flute is a resonator opened at both ends, thus the opening at the lip plate allows way to much of the pulsating air jet from the compressor to escape uncoupled in free air.
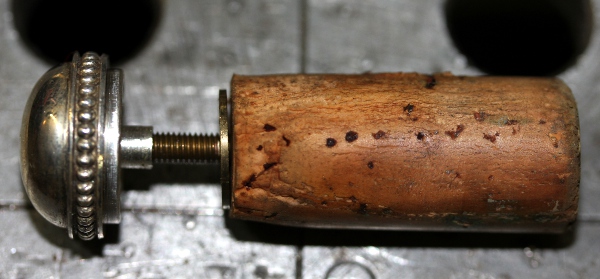
3.- As in the experiment before, here again we make use of a membrane compressor,
but this time we made an acoustic impedance converter ending in a tiny capilary
and inserted in the stop-end of the flute, exactly at the place where the normal
stop finds it place. This is at 17 mm from the middle of the lip plate orifice.
This way, the results are way better than what was achieved in the second experiment.
However, to get a realistic sound, it proved mandatory to also provide in a
way to dynamically cover the lip plate orifice. To this end we made a mechanism
driven by a softshift solenoid, moving a flap of thin and flexible silicone
membrane close to the orifice.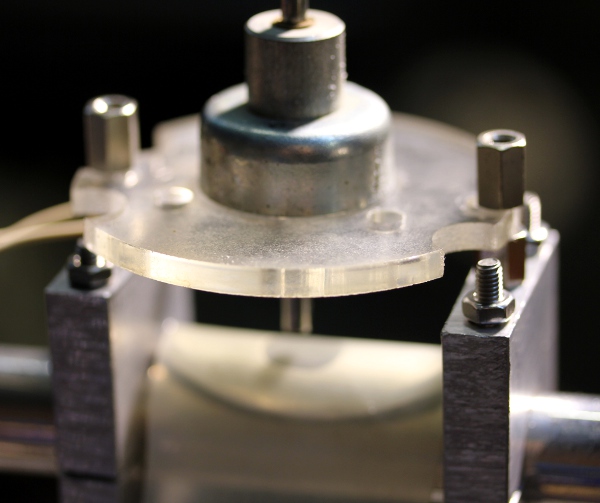 After adding this silicone flap, we discovered that it became possible to extend
the note range of the flute by a full octave in the low. When the flap is fully
closed, the flute behaves like a clarinet and sounds an octave lower. Of course,
in this extended register, one should not expect the flute to sound like a flute
anymore...
After adding this silicone flap, we discovered that it became possible to extend
the note range of the flute by a full octave in the low. When the flap is fully
closed, the flute behaves like a clarinet and sounds an octave lower. Of course,
in this extended register, one should not expect the flute to sound like a flute
anymore...
After performing these experiments, we decided to go the way of the thirth
one. Here is a picture of the membrane compressor: 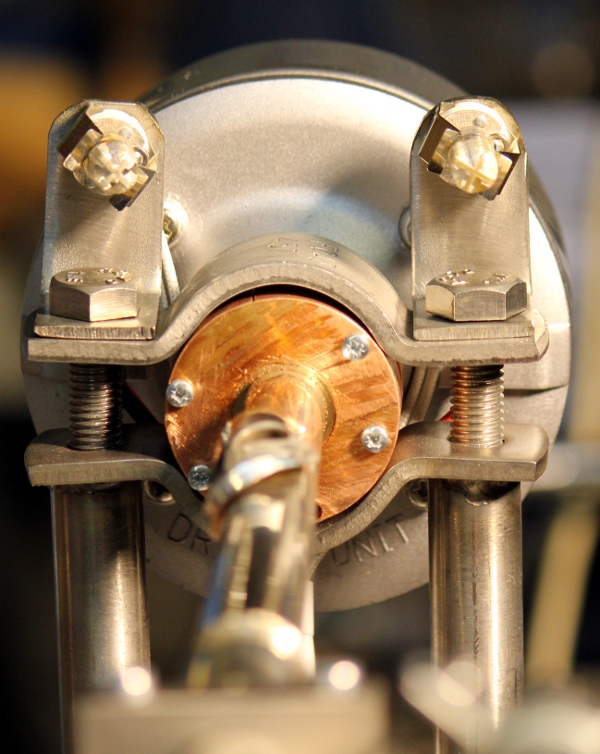 The research on determining the ideal waveform for the excitation of the membrane
compressor in <Flut> lead to a generalisable method, consisting in short
of exciting the instrument with a recorded wave of the instrument, recording
the output and than subtracting the difference between the two from the input
wave multiplied by two. This procedure leads to a waveform corresponding to
the exciting wave on the instrument. For a more in depth discussion, I refer
to the corresponding paragraphs in my paper "Expression
control in musical automatons".
The research on determining the ideal waveform for the excitation of the membrane
compressor in <Flut> lead to a generalisable method, consisting in short
of exciting the instrument with a recorded wave of the instrument, recording
the output and than subtracting the difference between the two from the input
wave multiplied by two. This procedure leads to a waveform corresponding to
the exciting wave on the instrument. For a more in depth discussion, I refer
to the corresponding paragraphs in my paper "Expression
control in musical automatons".
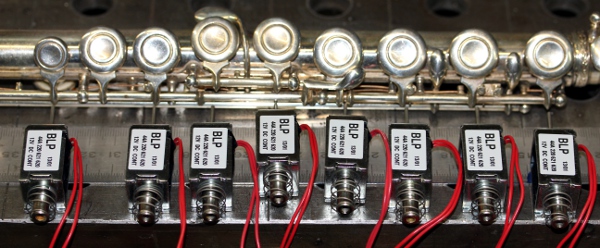
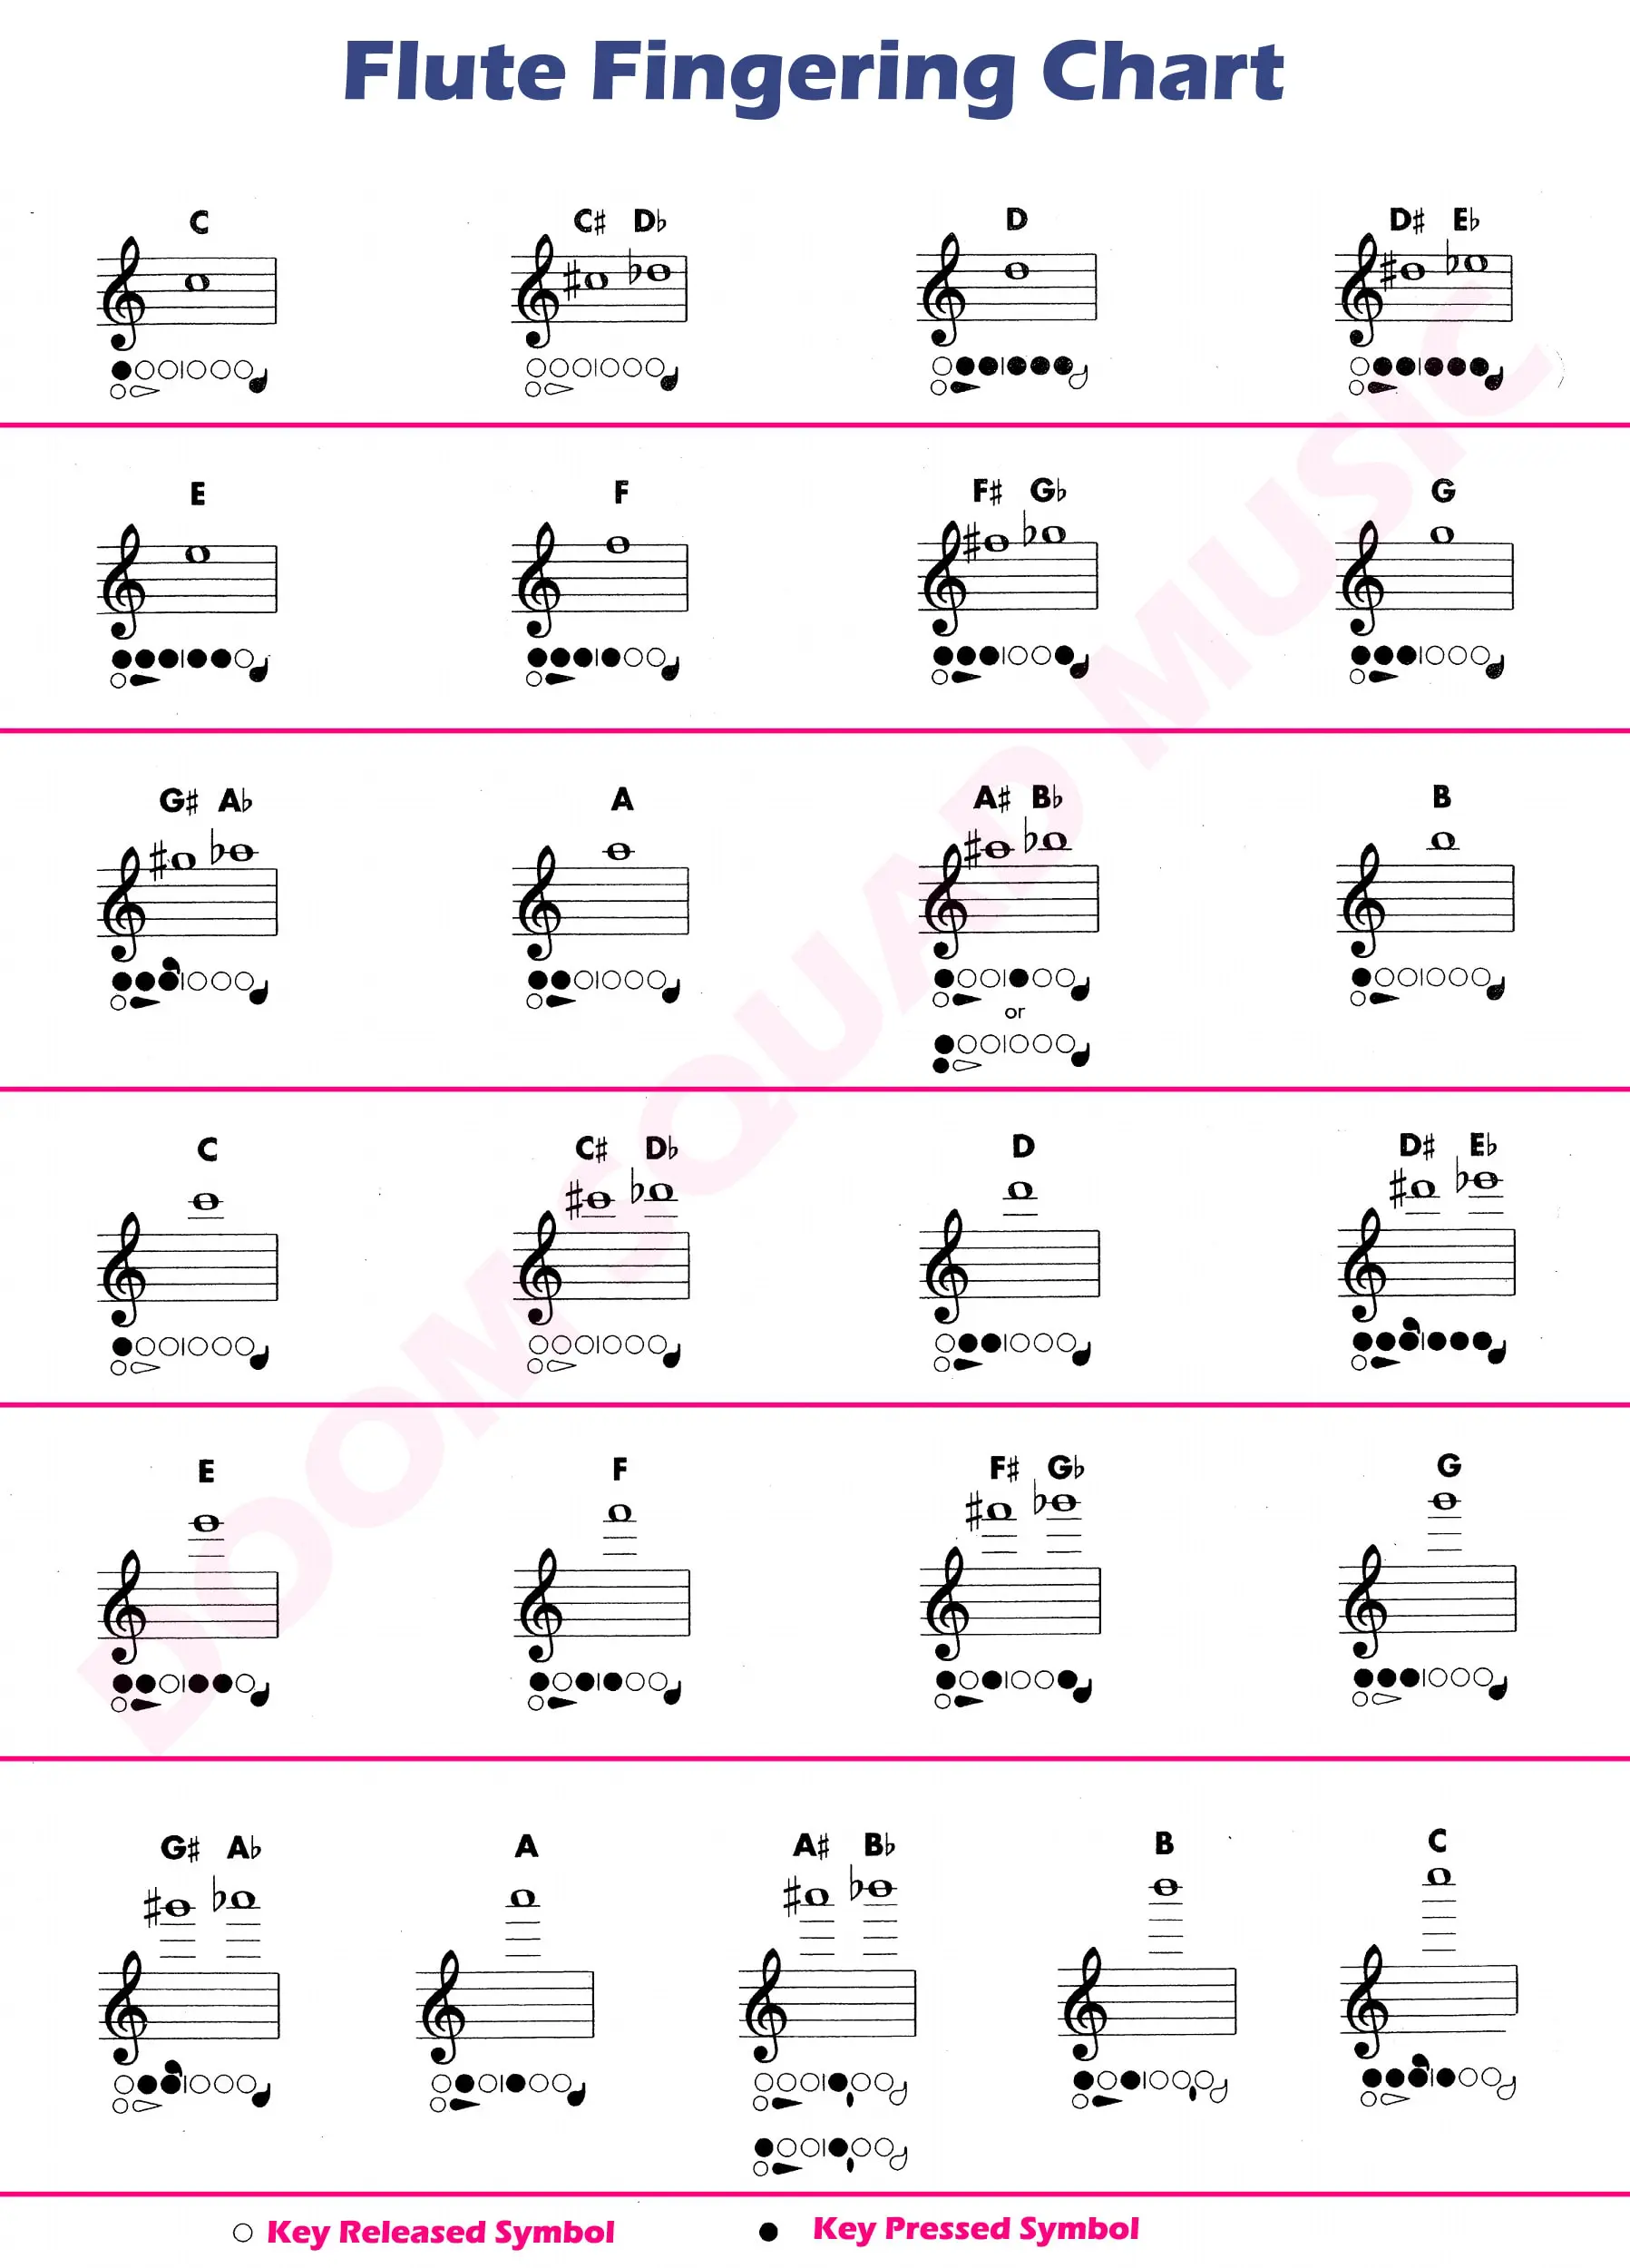
As to the valves, the task was much easier to accomplish. Fingering on wind instruments is a problem we already solved to great perfection in our robots <Fa>, <Klar>, <Ob> and <Asa>. The only problem here is that the response time of the solenoids used for the fingering is in the order of 5 to 10 ms, whereas the membane compressor reacts in about 1 ms. If we wanted to automate this to perfection, we should find a way to delay the commands for the membrane compressor, such that the resonance in the tube only occurs after the fingering allows it. In this robot we first went only one step in this direction, by sending only parsed midi to the membrane driver, whereas the solenoid driver board is steered by the command directly. However, the gain was only about 1 ms... Later on, we developed the software such that the delay time is a function of context and fingering: for repeated notes using the same fingering, a delay is not required. Neither is it required for full legato playing. As the robot cannot look ahead into the music, we implemented legato playing only for successive note-on commands, without corresponding note-off's. Most commercial sequencer software does not allow this however. The build-in delay time on successive notes requiring different fingerings is now 7.5 ms.
Circuit overview: 
The circuitry for the valves follows an old recipe we have used for at least
some 30 earlier robots (<Qt>, <Player Piano>, <Pos>, <Harmo>,
<Bomi>...) wherein we implemented velocity sensitvity for the notes: 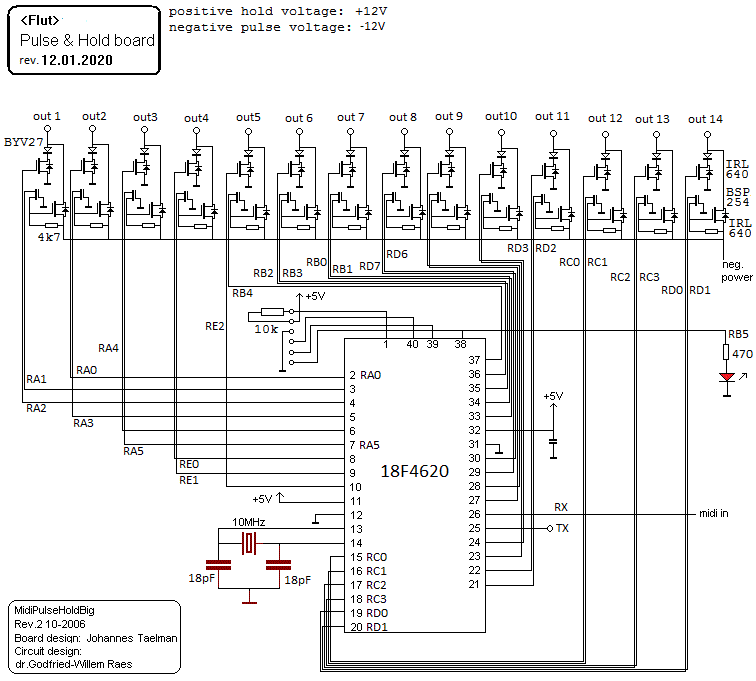 The detail of the workings of the pulse-hold system are:
 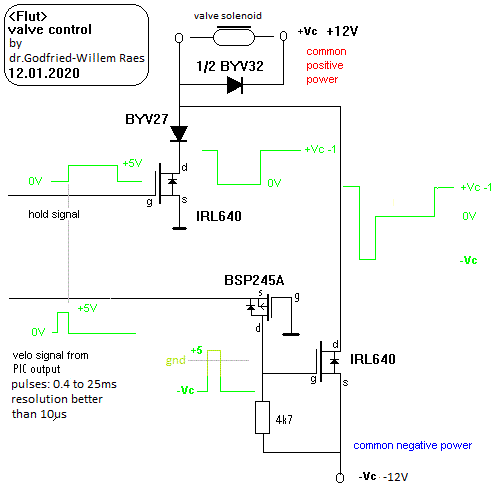 The
PCB, with components looks like this:
The
PCB, with components looks like this: 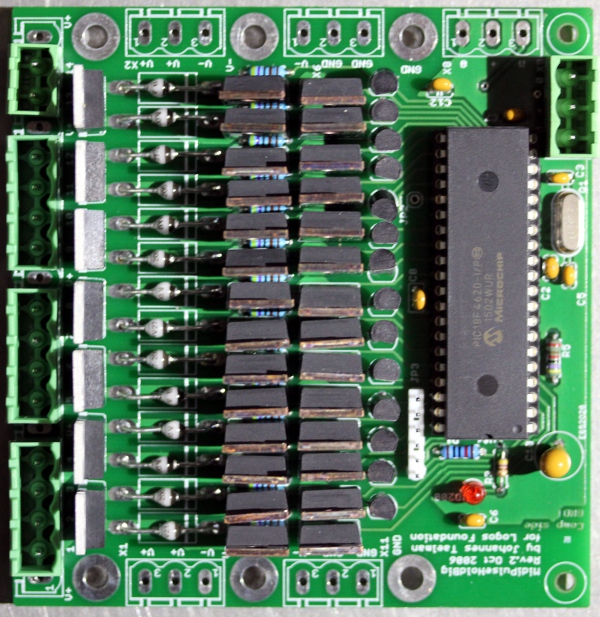
The source code for the firmware can be read here. The hex-dump required for programming the chip here.
A midi-hub board is used to implement the delay-times for buffered and parsed midi, for the valves not requiring the velocity control and for the softshift solenoid used for the silicone lips. This board also houses the power relay steered by controller #66. Here is the circuit:
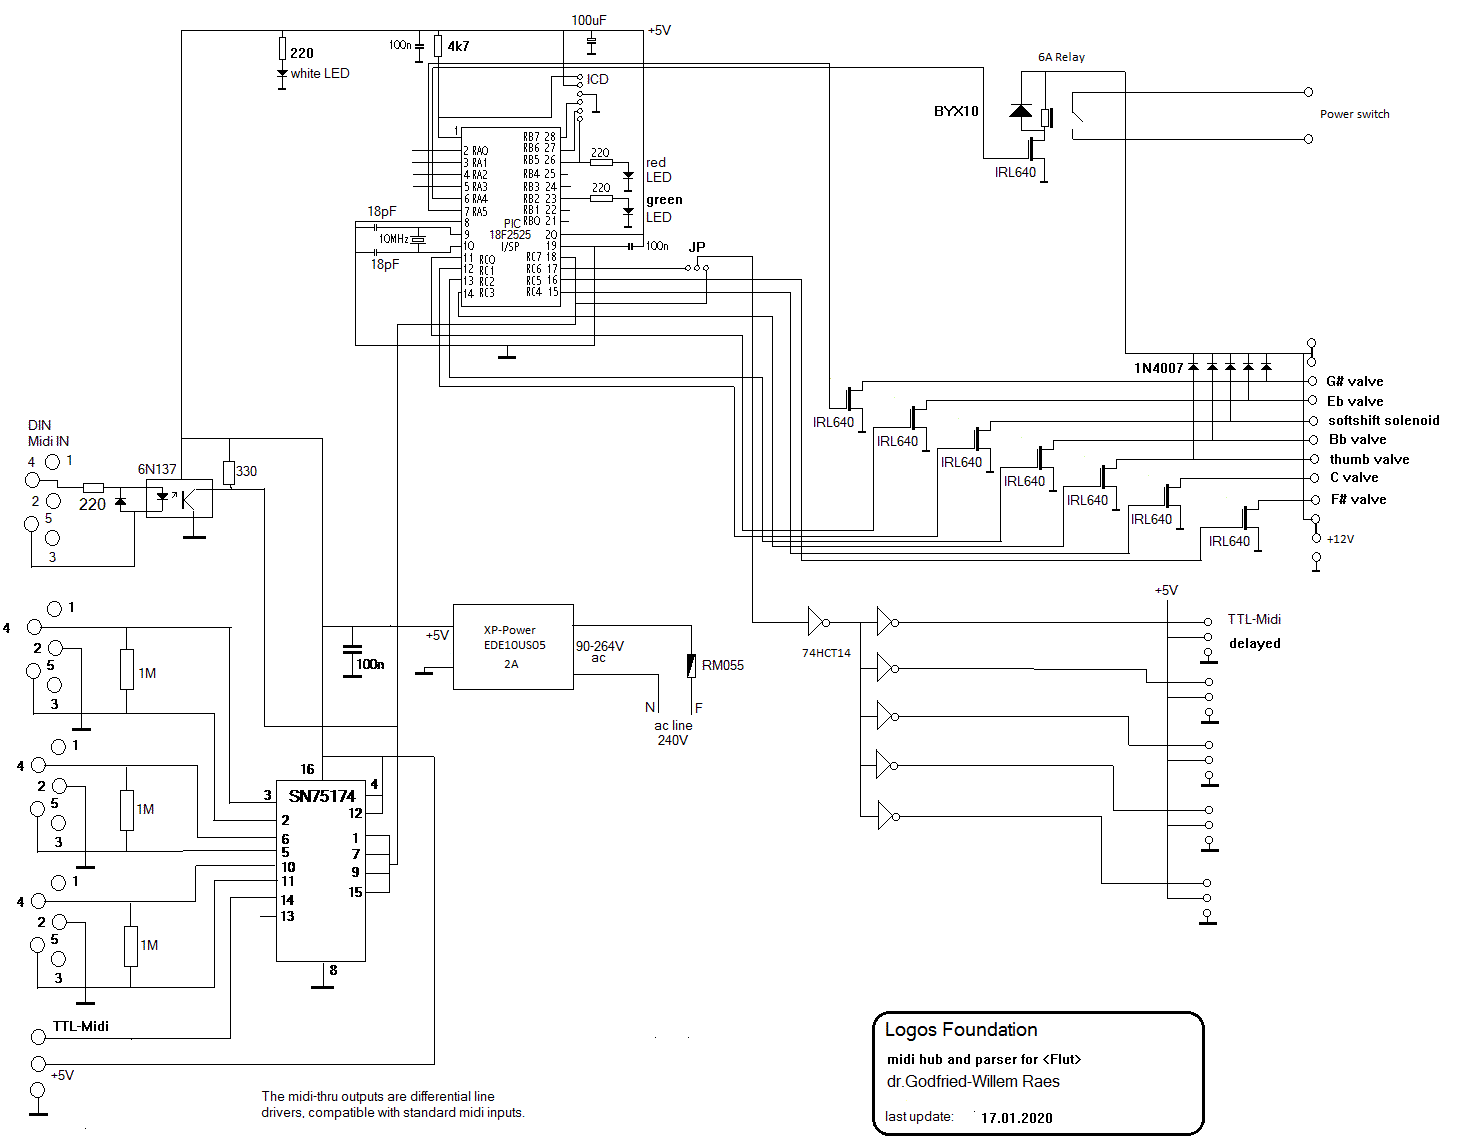 And this is the soldered
PCB:
And this is the soldered
PCB: 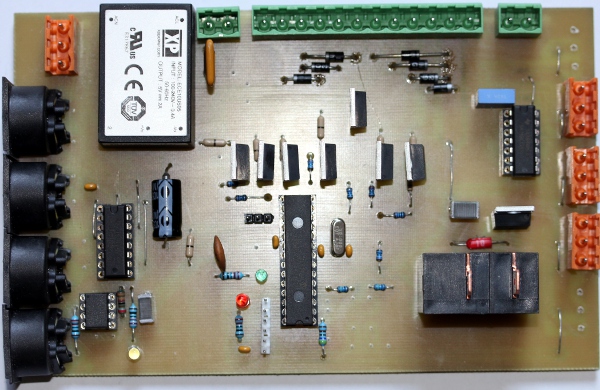
The source code for the firmware can be read here. The hex dump for programming the chip is here.
The circuit for the membrane compressor, using a 16-bit processor, is here:
 And here again, we
have a picture of the soldered PCB:
And here again, we
have a picture of the soldered PCB: 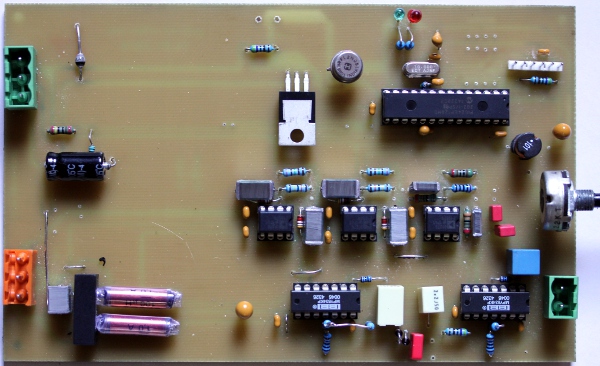
The source code for the firmware can be read here. The hex-dump required for programming the chip here.
The power supplies used accept any ac voltage between 100V and 240V and thus
this robot can be used in all countries without the need for a transformer.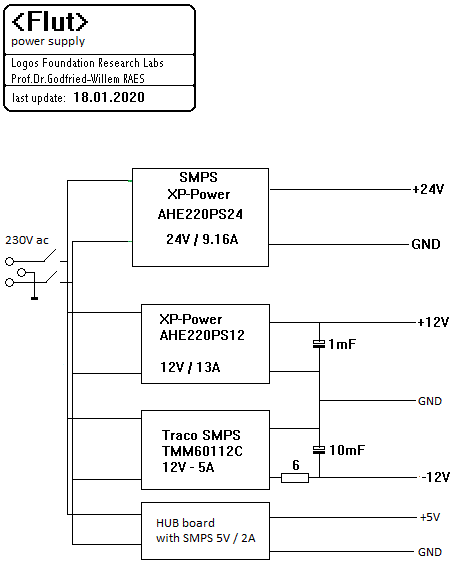
Design and construction: dr.Godfried-Willem Raes
Collaborators on the construction of this robot:
Midi implementation:
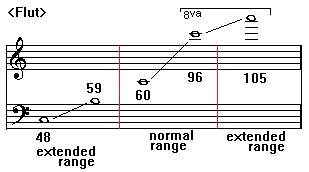
Bits 0 to 2 select the waveforms to be used in the medium register (notes 72 to 92)
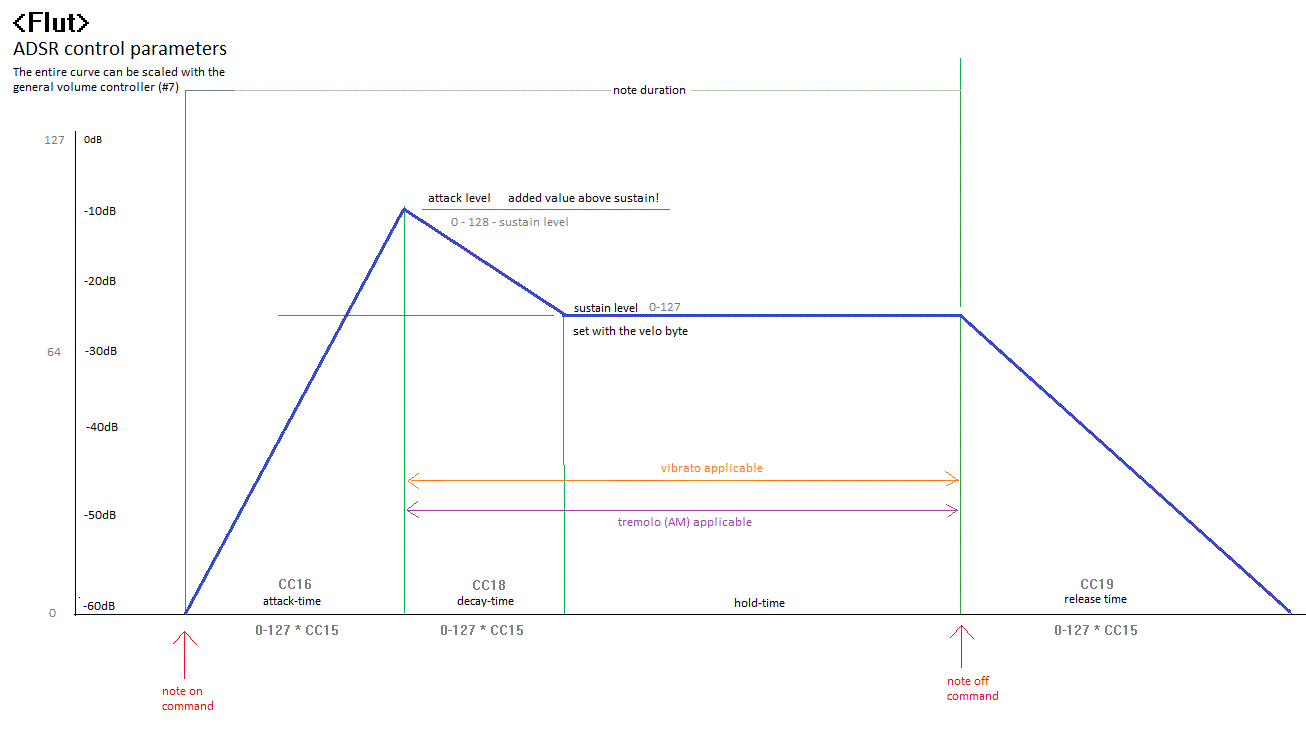
The lights on <Flut> are controlled with note-on/off commands mapped on the notes 120 to 124. The velocity byte steers the flashing speed. With velo=127, the lights are switched on without flashing.
Note:
The flute, as all windinstruments, is a strict monophonic instrument. It should be treated as such in midi-files. Dont treat is as if it were a keyboard with flute sounds. If midifiles or real-time midi datastreams contain note-off commands not corresponding to the sounding note, things may go wrong. Such conditions happen when legato playing is sent whereby notes overlap. If polyphonic keyboards are used to play the instrument, such failures will be observed right away. Note that it is perfectly legal on monophonic instruments to play successive notes without sending note-off commands. This is in fact the best way to implement pure legato playing. Sequencer users also are warned about too excessive use of continuous controller messages, generally caused by 'drawing' controllers. Due to the hardware low-pass filters on the volume and adsr controllers, is makes no sense to send more than 15 such messages per second. Sending more can cause interference with the pitches generated. This equally applies to the pitchbend commands. Reasonably good sequencers have tools to let you thin controllers. In Sonar for instance, there are CAL scripts you can invoke to do exactly this.
Technical specifications:
This robot, as yet playing pretty well, may still undergo minor improvements. We are awaiting feedback from our users. This building project was finalized by the end of 2020. With the construction of this robot, we have made automated versions of all instrument members of the traditional symphony orchestra, apart from the strings.
| Back to composers guide to the M&M robot orchestra. | Back to Main Logos page:index.html | To Godfried-Willem Raes personal homepage... | To Instrument catalogue |  |
Robot: <Flut>
Het lag nooit in onze bedoeling een dwarsfluit te automatiseren. Pogingen daartoe werden al ettelijke decennia geleden ondernomen o.m. door mijn vriend en kollega Martin Riches. Bovendien bevat het robotorkest eigenlijk al vrij veel met labiaalpijpen opgebouwde orgels, waardoor het ontbreken van een fluit in het orkest niet echt als een gemis werd aangevoeld. Op mijn 68ste verjaardag echter, kreeg ik van Lara Van Wynsberghe toch wel een dwarsfluit kado. In redelijk goede staat nog wel, een eenvoudig instrument van Rampone & Cazzani gebouwd in Milaan. We begonnen het toch weer te overwegen... Vooral ook, omdat door de toevoeging van een heuse dwarsfluit aan het robotorkest, we afgezien van de strijkers, daarmee alle instrumenten van het symfonisch orkest zouden hebben geautomatiseerd.
Automatisering van het mechanisme lijkt een vrij rechttoe rechtaan ontwerp te zijn, aangezien we kunnen putten uit onze ervaringen met de automatisering eerder van de hobo, de klarinet, saxofoons en de fagot. Voor een dwarsfluit kunnen we volstaan met 14 elektromagneten. De kleppen en het mechanisme kunnen we integraal behouden. Het aanblazen evenwel stelt bijzondere moeilijkheden en vormt een probleem dat we nooit eerder aanpakten. De luchtstroom moet immers niet alleen snel en plastisch moduleerbaar zijn, maar ook de richting van de luchtstroom en de diameter ervan moeten goed en soepel bestuurbaar zijn.
In totaal blijken er minstens vier vrijheidsgraden van beweging noodzakelijk
te zijn: de afstand tussen de opening van de luchtstroom en de rand van het
mondstuk, de hoek waaronder de luchtstroom op de rand gericht wordt, de luchtdruk
/ debiet van de luchtstroom, de articulatie van de luchtstroom. Uiteraard is
de konstruktie van de automatische fluit van Martin Riches ons goed bekend.
Die was immers reeds in 1978 te gast bij Stichting Logos. Die konstruktie vermocht
evenwel slechts het laagste oktaaf van de fluit te laten klinken. Overblazen
was niet mogelijk, omdat de hoek waaronder het aanblazen gebeurt niet kon gewijzigd
worden. Variatie van de luchtdruk was wel mogelijk binnen bepaalde en erg beperkte
grenzen. De mogelijkheden op gebied van articulatie waren uiterst beperkt.
Een alternatieve aanpak zou erin kunnen bestaan, pulserende lucht op de rand van het mondstuk te richten en zo resonantie in de fluit te bekomen. In dit geval hebben we geen blazende luchtstroom nodig. Ook zou kunnen worden geprobeerd om de buisresonantie op de wekken via een membraankompressor met Laval-tuit op de plaats waar de stop zich bevindt. Hier is een schets voor zo'n konstruktie:
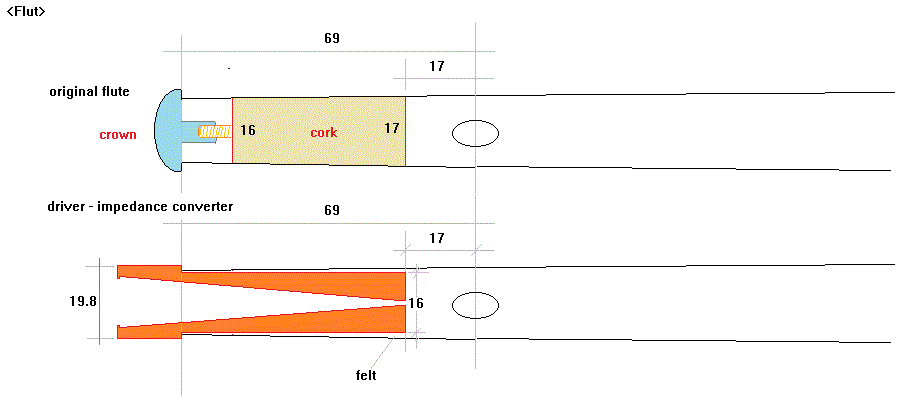
Onze eerste experimenten deden we dan ook met een dergelijke konstruktie. Zaak
bleek wel de opening van het kapilair aan het uiteinde van de Laval-tuit zo
klein mogelijk te houden zodat de 'stop' zich toch zoveel mogelijk als akoestisch
gesloten zou gedragen. Hier is een foto: 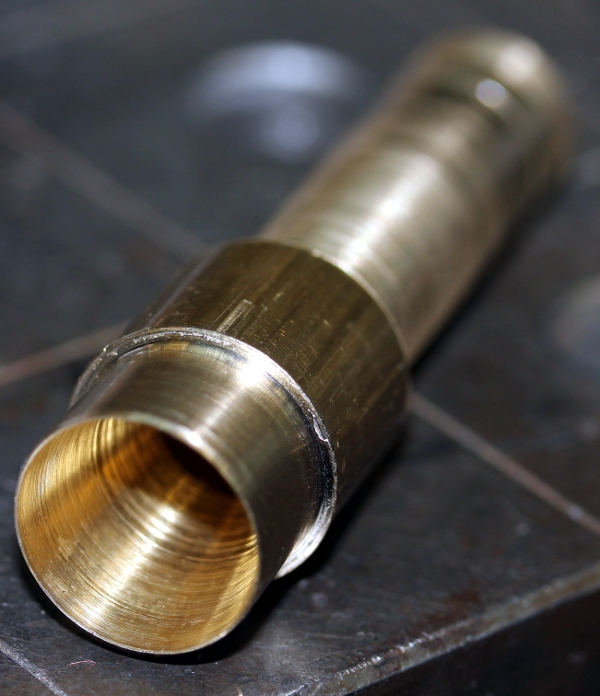 Het
kapilair aan de smalle kant is 10 mm lang en heeft een diameter van 3 mm. Het
aanblaasgat blijft in deze konstruktie open en vrij zodat de fluit zich akoestisch
blijft gedragen als een aan beide zijden open buis. Aangezien de rand van het
klankgat hier niet wordt gebruikt, valt ook het typische ruis-geluid eigen aan
de fluit hier weg. Dit diende dan ook in de firmware voor de membraankompressor
te worden geimplementeerd. Hier is een foto van de gemonteerde driver:
Het
kapilair aan de smalle kant is 10 mm lang en heeft een diameter van 3 mm. Het
aanblaasgat blijft in deze konstruktie open en vrij zodat de fluit zich akoestisch
blijft gedragen als een aan beide zijden open buis. Aangezien de rand van het
klankgat hier niet wordt gebruikt, valt ook het typische ruis-geluid eigen aan
de fluit hier weg. Dit diende dan ook in de firmware voor de membraankompressor
te worden geimplementeerd. Hier is een foto van de gemonteerde driver: 
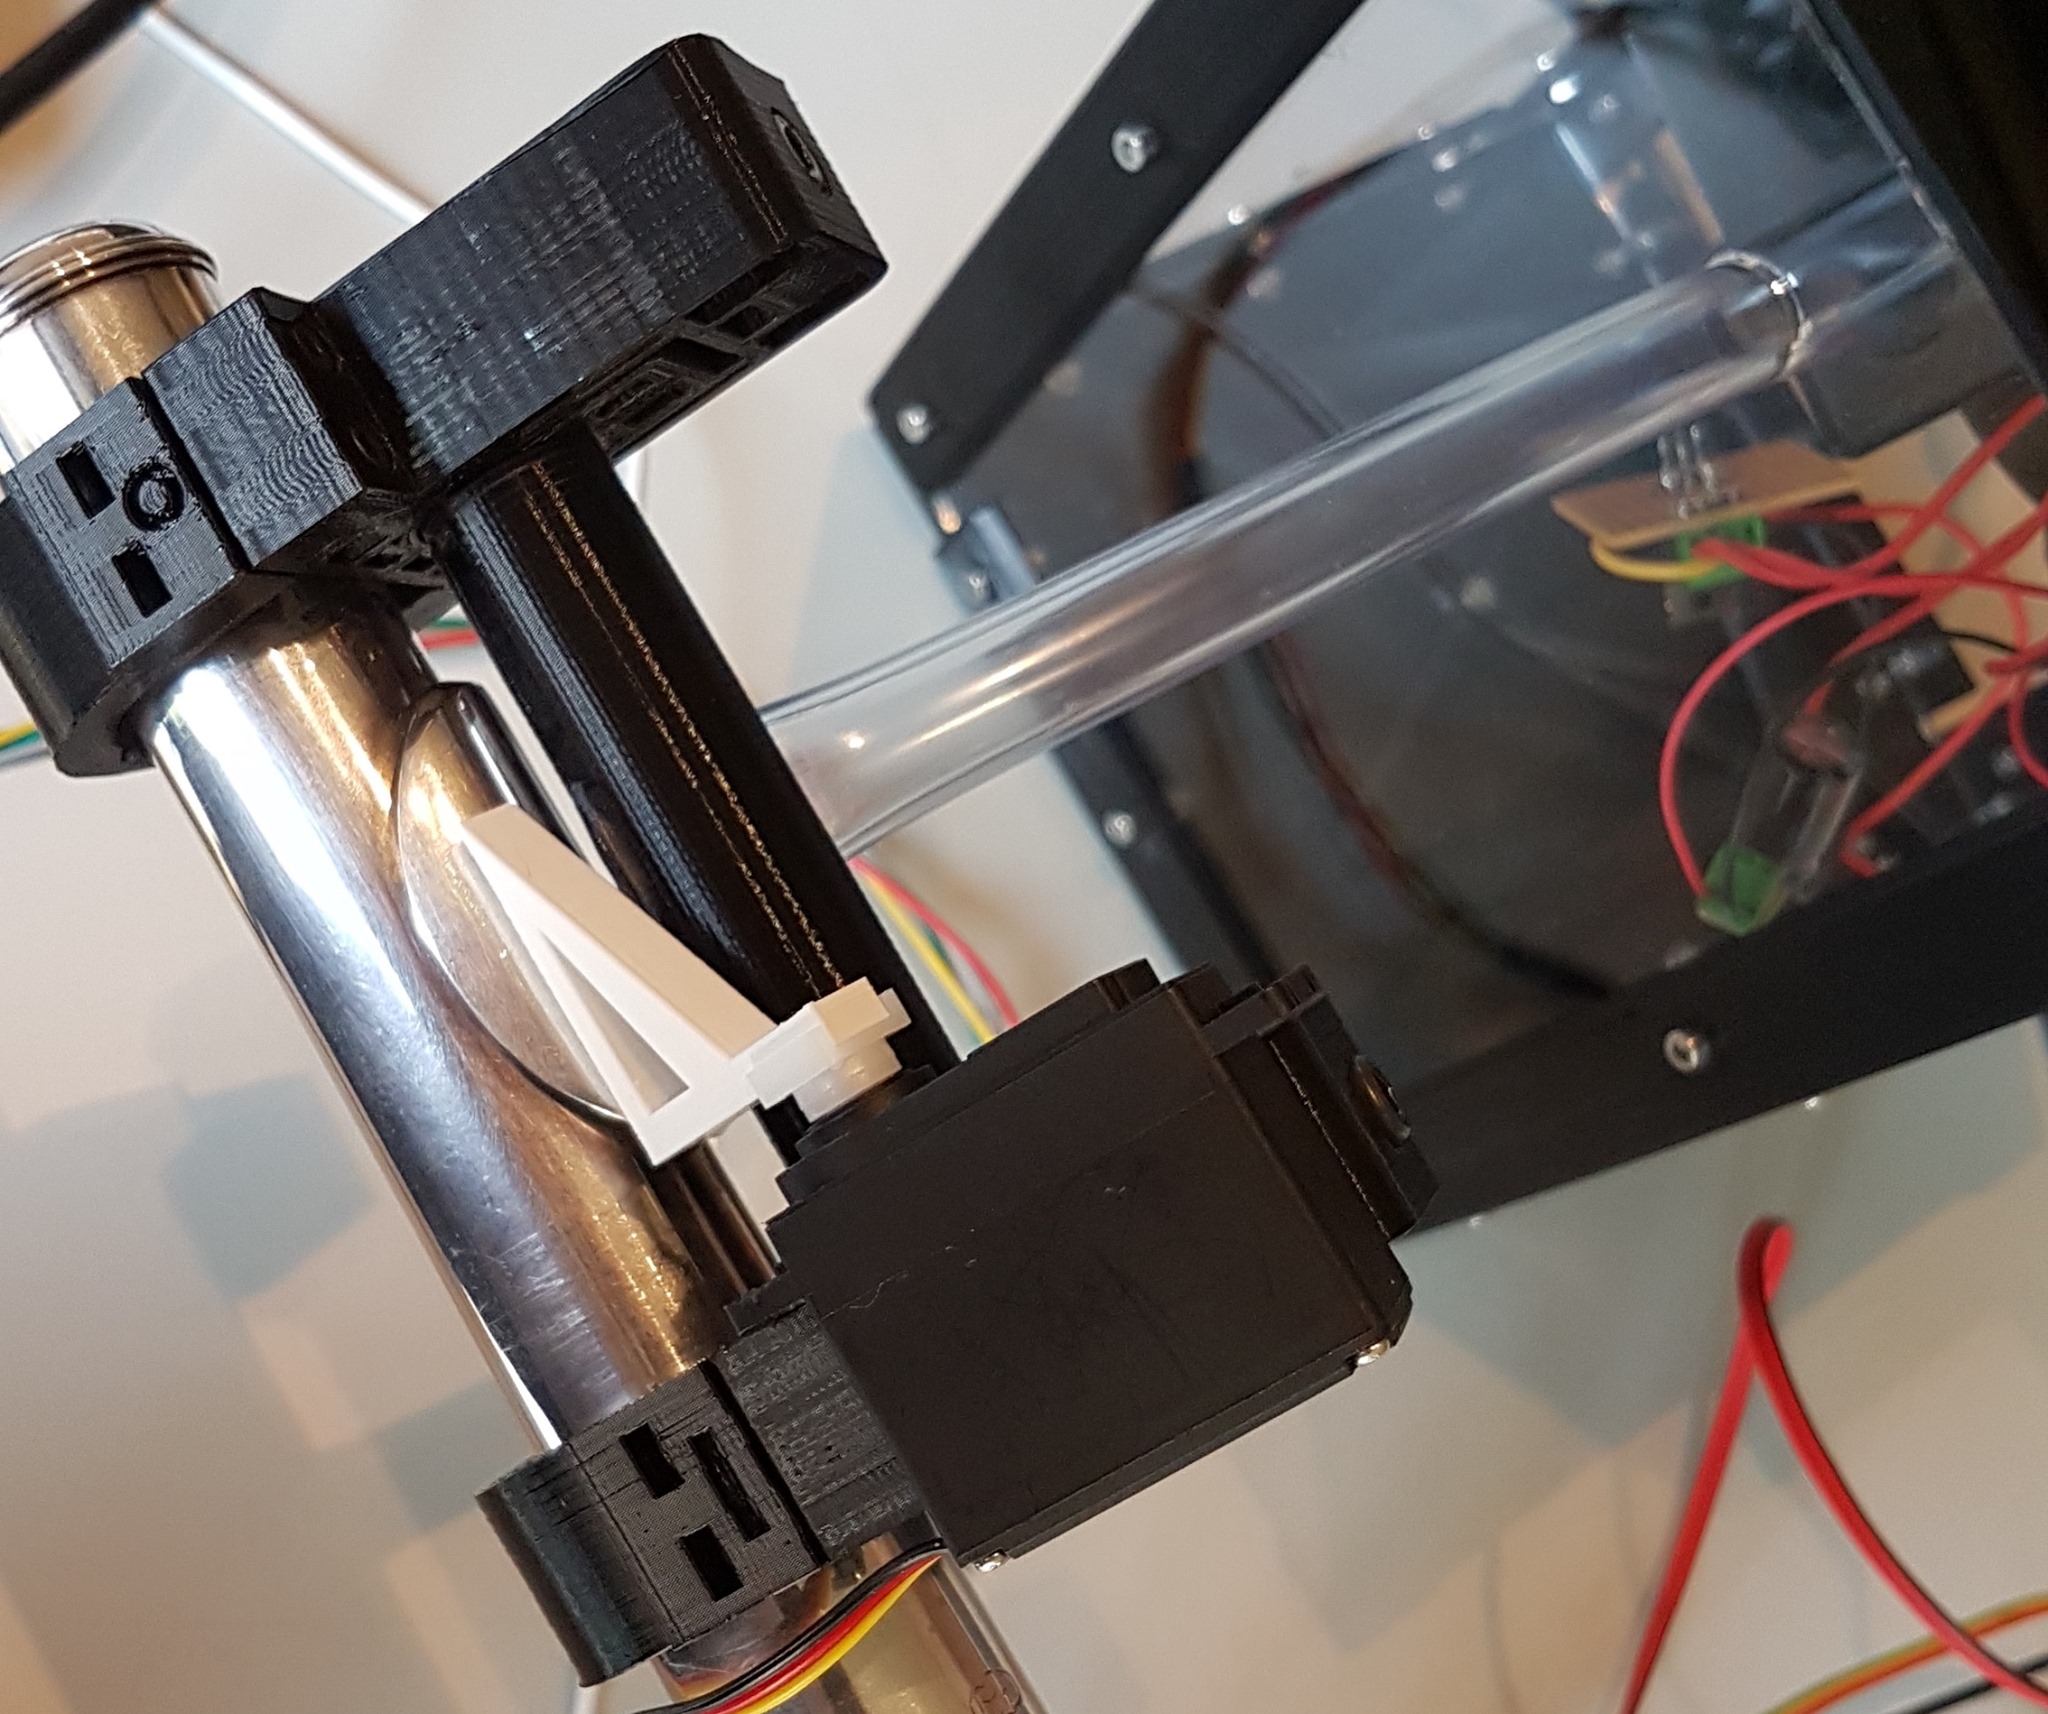
De maatvoering voor de plaatsing van de elektromagneten konden we eenvoudig afleiden uit volgende foto's:

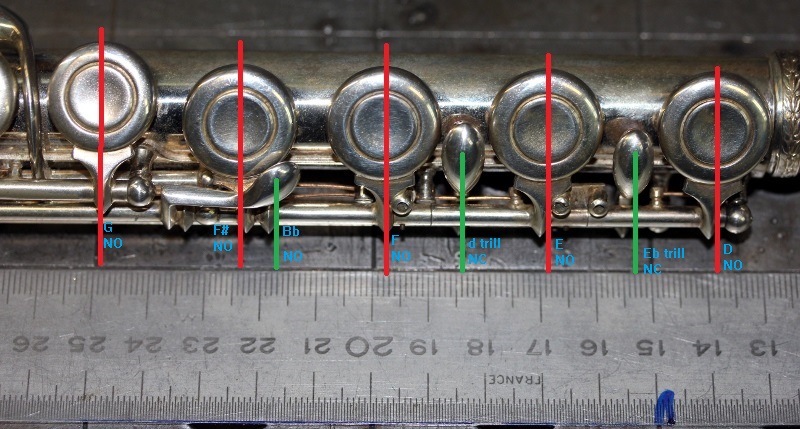

Implementatie van de vingerzettingen:
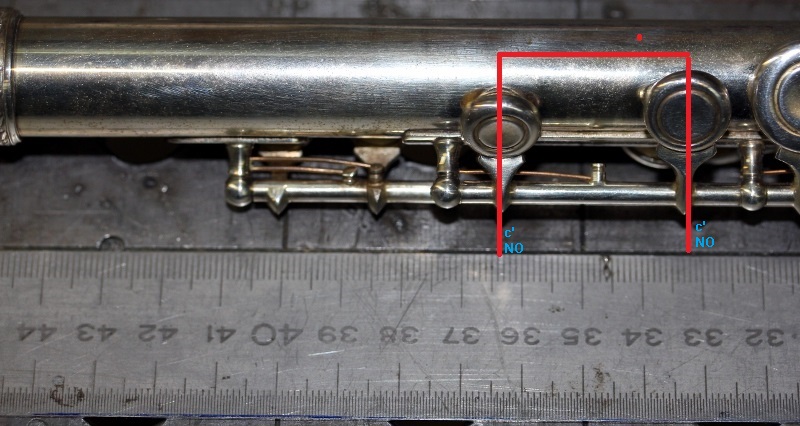
We zagen af van het automatiseren van de trillerkleppen voor re en re# in het tweede oktaaf omdat een zinnig gebruik daarvan vergt dat we vooruit kunnen kijken in de te spelen muziek, iets wat voor een real time robot vrijwel onmogelijk is. De kleppen voor Eb en G# zijn (naast de niet als dusdanig geimplementeerde, maar wel geautomatiseerde trillerkleppen) in rust gesloten. Alle andere zijn open in rust.
| noot | C-klep | C# | Eb | D | E | F | F# | G | G# | A | Bb | c | B (duim) | tril D | tril D# | nr.coils |
| 60 - C | on | on | off | on | on | on | (on) | on | off | on | (on) | on | on | off | off | 9 |
| 61 | off | on | off | on | on | on | (on) | on | off | on | (on) | on | on | off | off | 8 |
| 62 | off | off | off | on | on | on | (on) | on | off | on | (on) | on | on | off | off | 7 |
| 63 | off | off | on | on | on | on | (on) | on | off | on | (on) | on | on | off | off | 8 |
| 64 | off | off | on | off | on | on | (on) | on | off | on | (on) | on | on | off | off | 7 |
| 65 | off | off | on | off | off | on | (on) | on | off | on | (on) | on | on | off | off | 6 |
| 66 | off | off | on | on | off | off | off | on | off | on | (on) | on | on | off | off | 6 |
| 67 | off | off | on | off | off | off | off | on | off | on | (on) | on | on | off | off | 5 |
| 68 | off | off | on | off | off | off | off | on | on | on | (on) | on | on | off | off | 6 |
| 69 | off | off | on | off | off | off | off | off | off | on | (on) | on | on | off | off | 4 |
| 70 | off | off | on | off | off | on | off | off | off | off | on | on | on | off | off | 4 |
| 71 | off | off | on | off | off | off | off | off | off | off | off | on | on | off | off | 3 |
| 72 - c | off | off | on | off | off | off | off | off | off | off | off | on | off | off | off | 2 |
| 73 | off | off | on | off | off | off | off | off | off | off | off | off | off | off | off | 1 |
| 74 | off | off | off | on | on | on | (on) | on | off | on | (on) | off | on | off | off | 6 |
| 75 | off | off | on | on | on | on | (on) | on | off | on | (on) | off | on | off | off | 7 |
| 76 | off | off | on | off | on | on | (on) | on | off | on | (on) | on | on | off | off | 7 |
| 77 | off | off | on | off | off | on | (on) | on | off | on | (on) | on | on | off | off | 6 |
| 78 | off | off | on | on | off | off | off | on | off | on | (on) | on | on | off | off | 6 |
| 79 | off | off | on | off | off | off | off | on | off | on | (on) | on | on | off | off | 5 |
| 80 | off | off | on | off | off | off | off | on | on | on | (on) | on | on | off | off | 6 |
| 81 | off | off | on | off | off | off | off | off | off | on | (on) | on | on | off | off | 4 |
| 82 | off | off | on | off | off | on | (on) | off | off | off | off | on | on | off | off | 4 |
| 83 | off | off | on | off | off | off | off | off | off | off | off | on | on | off | off | 3 |
| 84 -c" | off | off | on | off | off | off | off | off | off | off | off | on | off | off | off | 2 |
| 85 | off | off | on | off | off | off | off | off | off | off | off | off | off | off | off | 1 |
| 86 | off | off | on | off | off | off | off | on | off | on | (on) | off | on | off | off | 4 |
| 87 | off | off | on | on | on | on | (on) | on | on | on | (on) | on | on | off | off | 9 |
| 88 | off | off | on | off | on | on | (on) | off | off | on | (on) | on | on | off | off | 6 |
| 89 | off | off | on | off | off | on | (on) | on | off | off | (on) | on | on | off | off | 5 |
| 90 | off | off | on | on | off | off | off | on | off | off | (on) | on | on | off | off | 5 |
| 91 | off | off | on | off | off | off | off | on | off | on | (on) | on | off | off | off | 4 |
| 92 | off | off | on | off | off | off | off | on | on | on | (on) | off | off | off | off | 4 |
| 93 | off | off | on | off | off | on | (on) | off | off | on | (on) | off | on | off | off | 4 |
| 94 | off | off | off | off | off | on | (on) | off | off | off | (on) | off | on | off | on | 3 |
| 95 | off | off | off | off | off | off | off | on | off | off | (on) | on | on | on | off | 4 |
| 96 - c'" | off | off | off | off | off | on | (on) | on | on | on | (on) | on | off | off | off | 5 |
| 97 | off | off | on | off | off | off | off | off | off | off | off | off | off | off | off | 1 |
| 98 | off | off | on | off | off | off | off | on | off | on | (on) | off | on | off | off | 4 |
| 99 | off | off | on | on | on | on | (on) | on | on | on | (on) | on | on | off | off | 9 |
| 100 | off | off | on | off | on | on | (on) | off | off | on | (on) | on | on | off | off | 6 |
| 101 | off | off | on | off | off | on | (on) | on | off | off | (on) | on | on | off | off | 5 |
| 102 | off | off | on | on | off | off | off | on | off | off | (on) | on | on | off | off | 5 |
| 103 | off | off | on | off | off | off | off | on | off | on | (on) | on | off | off | off | 4 |
| 104 | off | off | on | off | off | off | off | on | on | on | (on) | off | off | off | off | 4 |
| 105 | off | off | on | off | off | on | (on) | off | off | on | (on) | off | on | off | off | 4 |
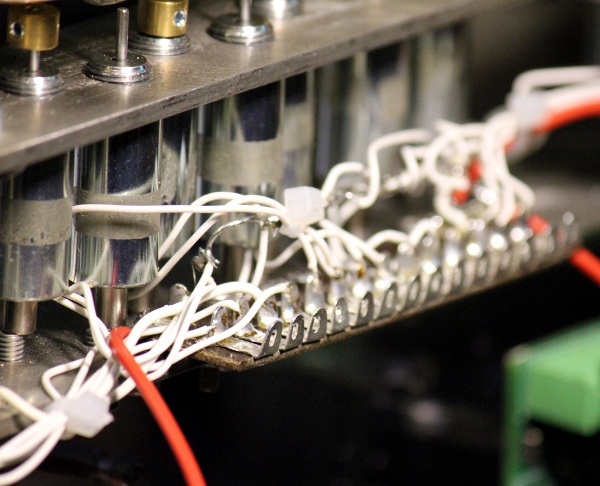
Met behulp van 15 elektromagneten kan het hele mechanisme volledig geautomatiseerd worden. Dertien kleppen kunnen met duwmagneten van onderuit bediend worden. De duimklep en de G# klep moeten wat zijdelings worden gemonteerd. Voor de besturing van de meeste kleppen besloten we kleine Lucas-Ledex tubular solenoids, type 195203-234 te gebruiken, hetzelfde type dat we eerder al gebruikten voor onze <Spiro> robot. Hier zijn de specs:
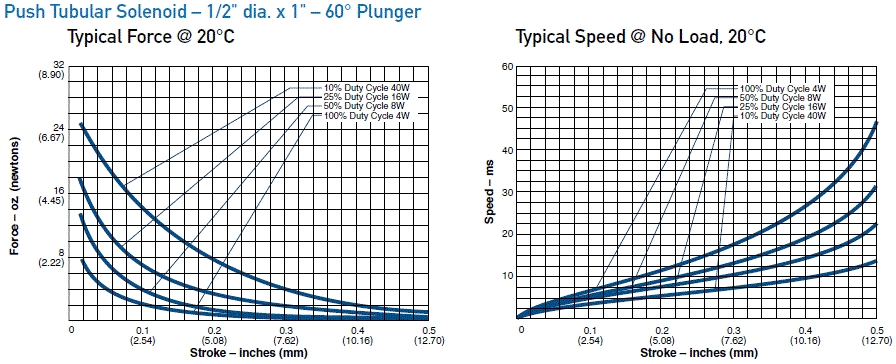
Het bewegingstrajekt nodig voor de kleppen van de fluit is ca.3 mm en voor geen enkele klep groter dan 5 mm. Dit brengt de responstijd van de kleppen (50% duty cycle bij een 24V voedingsspanning) op 7.5 ms. Een gevolg hiervan is dat we bij gewijzigde vingerzetting voor de produktie van een toon, de excitatie door de membraankompressordriver met een vertraging van 8 ms moeten laten geschieden. Om dat bereiken werd een intelligente vertragingslijn geimplementeerd in de kode voor het hub-board. 'Intelligent', want er wordt wel degelijk rekening gehouden met de muzikale kontekst en de al dan niet gewijzigde vingerzettingen.
| klep | solenoid | control | rest position | port | ||
| C | 1/2" | Hub board | open | RC4 | ||
| C# | 1/2" | Pulse-Hold board out1 | open | |||
| Eb | 5/8" | Hub board | closed | RC0 | ||
| D | 1/2" | Pulse-Hold board out2 | open | |||
| E | Pulse-Hold board out3 | open | ||||
| F | Pulse-Hold board out4 | open | ||||
| F# | Hub board | open | RC5 | |||
| G | Pulse-Hold board out5 | open | ||||
| G# | 5/8" | Hub board | closed | RA5 | ||
| A | Pulse-Hold board out6 | open | ||||
| Bb | Hub board | open | RC2 | |||
| c | Pulse-Hold board out7 | open | ||||
| B | Laukhuff traktuurmagneet | Hub board - duim | open | RC3 | ||
| d | Pulse-Hold board out8 | closed | ||||
| d# | Pulse-Hold board out9 | closed | ||||
| lips | Ledex Softshift | Hub board | open | RC1 |
Om de expressiemogelijkheden te vergroten, ontwierpen we een regelklep waarmee de opening van het aanblaasgat kan worden gemoduleerd. De klep is gemaakt uit siliconenrubber om wat te lijken op menselijke lippen. De besturing gaat met een kleine soft-shift elektromagneet aangedreven met een PWM signaal. Tremolo is op deze wijze mogelijk. Voor een echt Flatterzunge is de modulatiediepte net iets te klein. Tijdens de bouw van deze robot viel het ons op dat wanneer we deze klep volledig sluiten, het toonbereik met een oktaaf in de laagte kan worden uitgebreid. De fluit gedraagt zich dan immers als een gesloten pijp. Uiteraard komt de klankkleur in dit register niet meer overeen met die van een fluit maar veeleer met die van een klarinet.
Uiteraard deden we wat opzoekingswerk m.b.t. de akoestiek van de fluit. Voor
wat betreft de formant, geven diverse auteurs verschillende resultaten. Bachus
houdt het bij een enkele formant-frekwentie rond 800Hz, anderen geven bvb. dit:
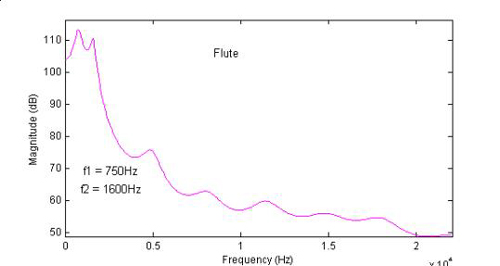 , waarbij in elk geval
opvalt dat de tweede frekwentie 40dB onder die van de eerste ligt. Gezien die
grote afstand verzaakten we aan de implementatie van die tweede formant frekwentie
in het ontwerp van de hardware voor de driver. We hielden bij bouw en ontwerp
van het aansturingsmechanisme terdege rekening met de verschillende registers
van de dwarsfluit. Zo klinken de noten 48-59 wat klarinetachtig, het laagste
oktaaf (60-71) heeft meer ruis en een meer uitgesproken oktaafharmoniek, het
medium register (72-92) heeft de karakteristieke fluitklank en voor het extreem
hoog register (93-105) wordt het wat schriel.
, waarbij in elk geval
opvalt dat de tweede frekwentie 40dB onder die van de eerste ligt. Gezien die
grote afstand verzaakten we aan de implementatie van die tweede formant frekwentie
in het ontwerp van de hardware voor de driver. We hielden bij bouw en ontwerp
van het aansturingsmechanisme terdege rekening met de verschillende registers
van de dwarsfluit. Zo klinken de noten 48-59 wat klarinetachtig, het laagste
oktaaf (60-71) heeft meer ruis en een meer uitgesproken oktaafharmoniek, het
medium register (72-92) heeft de karakteristieke fluitklank en voor het extreem
hoog register (93-105) wordt het wat schriel.
De besturings elektronika bestaat uit volgende modules:
1.- Midi parser en hub board (18F2620)
2.- Kleppen besturings board (14-output pulse/hold board) (18F4620)
De uitgangen 1 tot 9 worden gebruikt om de kleppen te besturen. Uitgangen 10 tot 14 worden gebruikt voor de besturing van de lichten op de robot.
3.- Membraan-kompressor driver: 16-bit processor (24EP128MC202):
Door de werking van het dynamisch formant filter (volledig analoog opgebouwd), is de klankkleur mede een funktie van de geluidsterkte, net zoals dat het geval is bij een 'gewoon' bespeelde dwarsfluit. De toonhoogtebepalende sample rate van pwm1 samen met de pwm modulatie zelf bepalen de golfvorm. De sample rate is hier 128 x de frekwentie van de te genereren toon. Pwm2 genereert de omhullende signalen (ADSR) die na filtering een eerste analoge multiplier aansturen. Pwm3 wordt ingezet voor de sturing van de geluidsdruk. Ook dit signaal wordt naar een analoge multiplier gestuurd.
4.- Vermogensversterker (Texas)
Dit is een zuiver digitale eindversterker, gebruikt in een brug konfiguratie voor monofone signalen.
5.- Voeding
Hier is een schematisch overzicht:
Mapping van de mikroprocessor uitgangen en bedrading:
| pulse/hold board | hold bit | velo bit | valve | lookup | byte lookup | wiring |
| out1 | RA2 | RA1 | C# | xxxx.xxxO | zwart | |
| out2 | RA0 | RA3 | D | xxxx.xxOx | bruin | |
| out3 | RA4 | RA5 | E | xxxx.xOxx | rood | |
| out4 | RE0 | RE1 | F | xxxx.Oxxx | oranje | |
| out5 | RE2 | RB4 | G | xxxO.xxxx | geel | |
| out6 | RB3 | RB2 | A | xxOx.xxxx | groen | |
| out7 | RB1 | RB0 | c' | xOxx.xxxx | blauw | |
| out8 | RD7 | RD6 | d tril | Oxxx.xxxx | violet | |
| out9 | RD5 | RD4 | d# tril | special case | grijs | |
| out10 | RC5 | RC4 | xxxx.xxxO | wit | ||
| out11 | RD3 | RD2 | xxxx.xxOx | wit/rood | ||
| out12 | RC0 | RC1 | center light | xxxx.xOxx | yellow/black | |
| out13 | RC2 | RC3 | eye light pwm on RC2 | xxxx.Oxxx | pink | |
| out14 | RD0 | RD1 | eye light | xxxO.xxxx | pink/black | |
| hub board | ||||||
| RC4 | - | C | xxxx.xxxO | zwart/wit | ||
| RC0 | - | Eb | xxxx.xxOx | geel/rood | ||
| RC5 | - | F# | xxxx.xOxx | rood/groen | ||
| RA5 | - | G# | xxxx.Oxxx | oranje/zwart | ||
| RC2 | - | Bb | pwm HPWM 1 | xxxO.xxxx | roze | |
| RC3 | - | Thumb- B | xxOx.xxxx | grijs/blauw | ||
| RC1 | - | mouth | pwm HPWM 2 | special case | groen |
De bronkode van de firmware (geschreven voor de Proton Compiler) , evenals de hex-dumps nodig om de chips te programmeren zijn beschikbaar via onderstaande links:
| PCB | PIC | Bronkode | Hexdump |
| Hub board | 18F2620 | Flut_Hub.bas | Flut_Hub.hex |
| Pulse/Hold board | 18F4620 | Flut_PH.bas | Flut_PH.hex |
| Membrane driver board | 24EP128MC202 | PIC24_flut.bas | PIC24_flut.hex |
Specifikaties:
Toonbereik:
Midi implementatie: (voor details, zie de uitgebreide engelse versie bovenaan deze pagina).
Technische gegevens:
Bouwdagboek - Construction Diary:

 In plaats van de BLP
magneten, kunnen we ook Lucas-Ledex magneten toepassen, hetzelfde type dat
we vroeger al gebruikten voor de bouw van de robots <Spiro> en <Toypi>.
In plaats van de BLP
magneten, kunnen we ook Lucas-Ledex magneten toepassen, hetzelfde type dat
we vroeger al gebruikten voor de bouw van de robots <Spiro> en <Toypi>.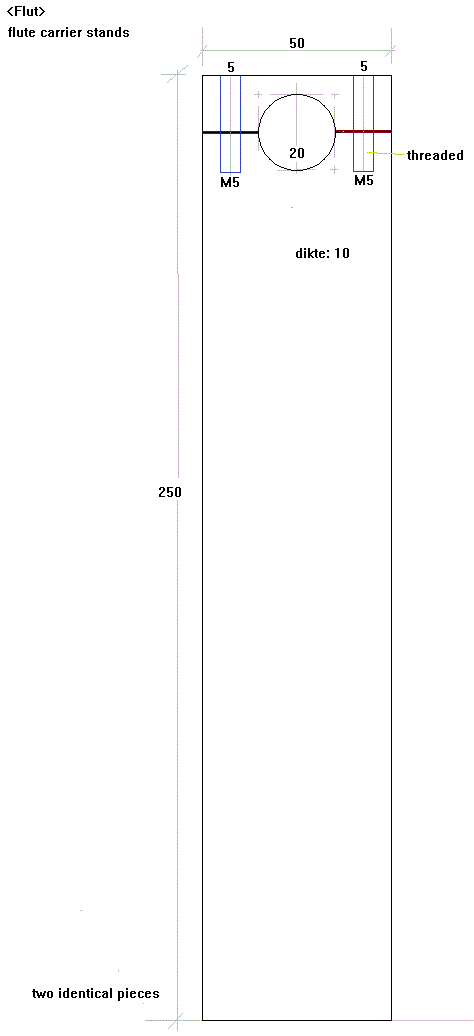 De dwarsfluit
wordt met de klemmen in de 20 mm ronde uitsparingen aangebracht en vastgezet
met vier M5x20 inox cilinderkop boutjes.
De dwarsfluit
wordt met de klemmen in de 20 mm ronde uitsparingen aangebracht en vastgezet
met vier M5x20 inox cilinderkop boutjes. 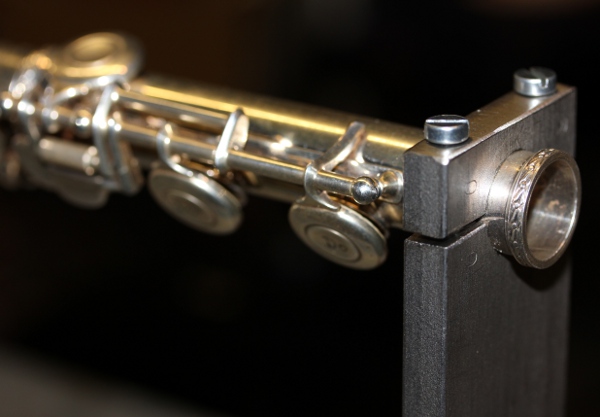
 Hier is de werktekening voor de konstruktie:
 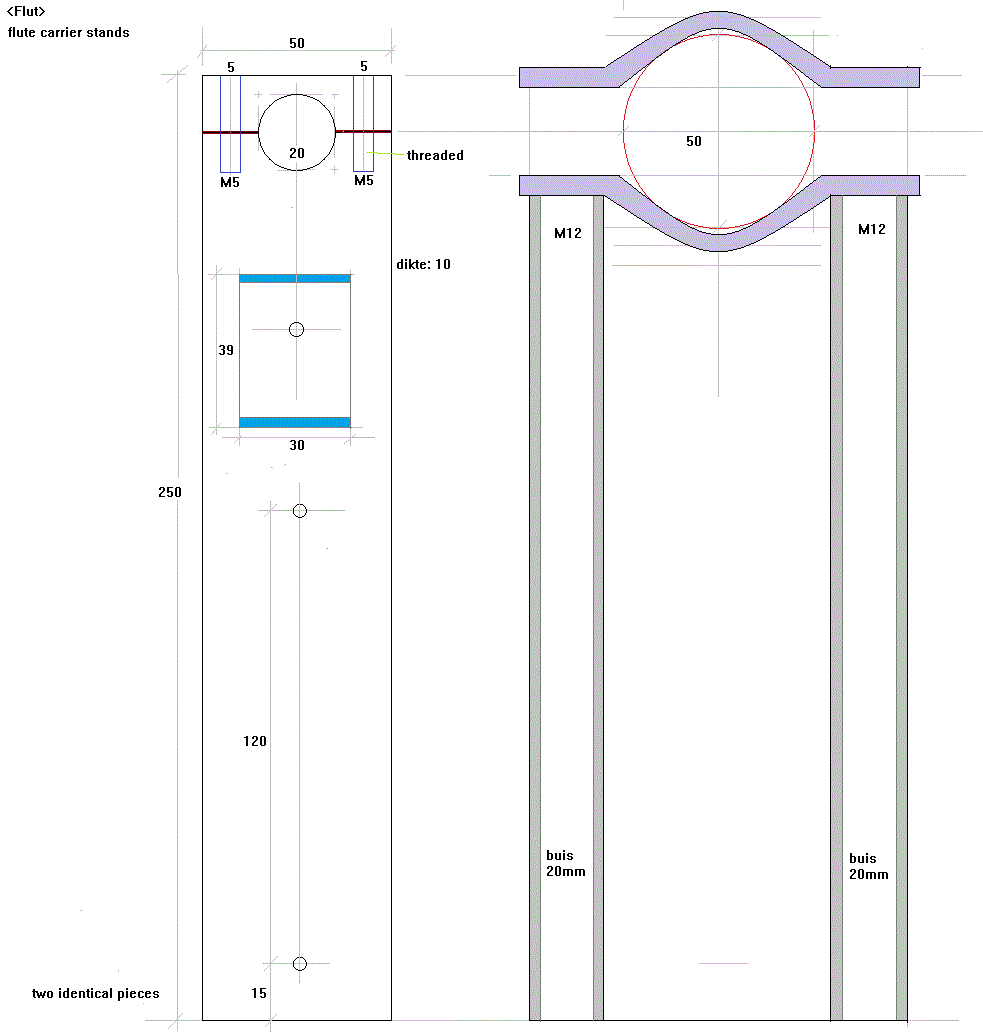 Begin konstruktie
van de houder voor de elektromagneten. Alle boorgaten voorzien van een 3/8"
UNEF schroefdraad voor de Lucas-Ledex magneten. De tappen daarvoor hadden
we nog op voorraad, want we gebruikten ze eveneens bij de konstruktie van
de <Spiro> robot. Voor de afregeling van het bewegingstrajekt, tapten
we alle gaatjes met M4 schroefdraad.
Begin konstruktie
van de houder voor de elektromagneten. Alle boorgaten voorzien van een 3/8"
UNEF schroefdraad voor de Lucas-Ledex magneten. De tappen daarvoor hadden
we nog op voorraad, want we gebruikten ze eveneens bij de konstruktie van
de <Spiro> robot. Voor de afregeling van het bewegingstrajekt, tapten
we alle gaatjes met M4 schroefdraad.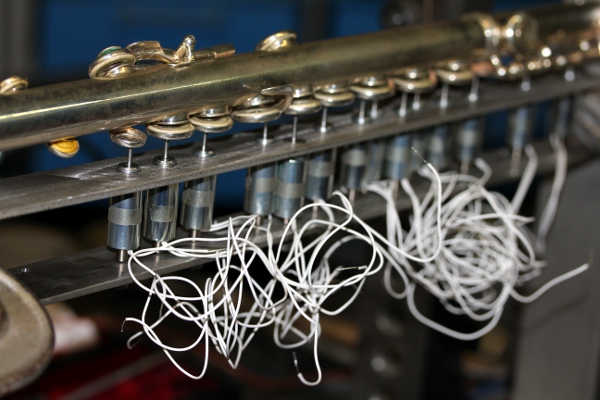 Eerste tests: blijkt dat enkele kleppen meer kracht nodig hebben om te sluiten
dan voorhanden met de gebruikte elektromagneten. De lage Mib klep (normaal
gesloten) heeft driemaal zoveel kracht nodig. Daarom wijzigden we konstruktie
zo dat voor die klep een Lucas-Ledex type STA196205-230 . kon gebruikt worden.
Het montagegat moest dan wel uitgeboord worden op 14.1 mm en aan de onderzijde
20 mm.
Eerste tests: blijkt dat enkele kleppen meer kracht nodig hebben om te sluiten
dan voorhanden met de gebruikte elektromagneten. De lage Mib klep (normaal
gesloten) heeft driemaal zoveel kracht nodig. Daarom wijzigden we konstruktie
zo dat voor die klep een Lucas-Ledex type STA196205-230 . kon gebruikt worden.
Het montagegat moest dan wel uitgeboord worden op 14.1 mm en aan de onderzijde
20 mm. 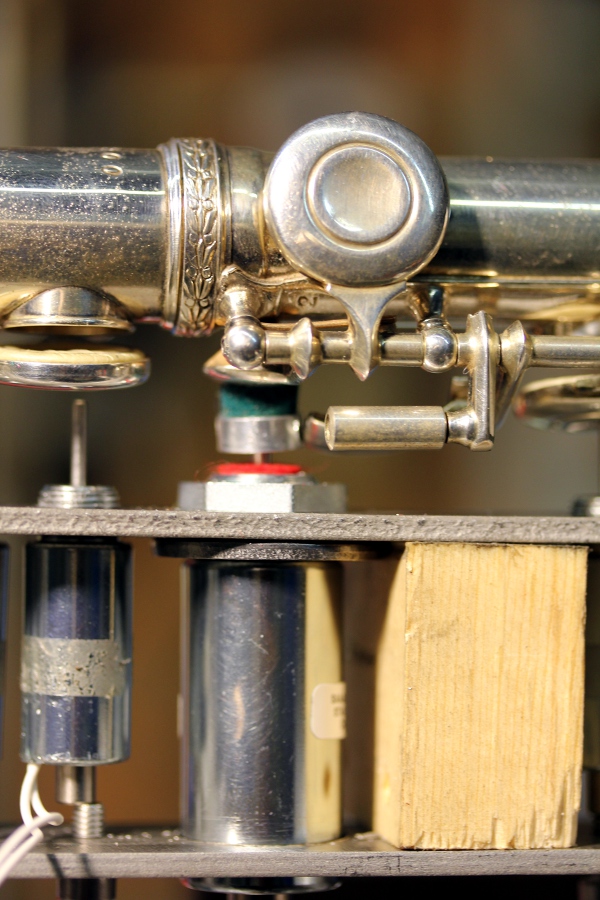 Voor de sol# klep
besloten we om dezelfde reden zo'n elektromagneet in te zetten, maar hiervoor
maakten we een uitstekende beugel waarop de magneet gemonteerd wordt.
Voor de sol# klep
besloten we om dezelfde reden zo'n elektromagneet in te zetten, maar hiervoor
maakten we een uitstekende beugel waarop de magneet gemonteerd wordt.  Verder
blijkt het nuttig alle naaldveren, die op de fluit kleppen open houden, te
verwijderen. Ons mechanisme houdt de kleppen immers in rust open door de zwaartekracht,
aangezien we de fluit ondersteboven monteren en gebruiken, Dit komt de responssnelheid
en ook het energieverbruik erg ten goede. Voor de duimklep moeten we nog een
goede oplossing verzinnen. Op het uiteinde van de ankers bevestigden we stelringen,
voorlopig met binnenmaat 2.1 mm, te groot voor deze toepassing maar we vonden
geen leverancier voor stelringen met een gatmaat van 1.5 mm. De hier gebruikte
stelringen komen van Conrad (bestelnummer 144-313-02 of 1-995-913). Ze zijn
voorzien van een M3 stelboutje. Voor de grotere Ledex spoelen gebruikten we
Pichler 'prop-savers' normaal toegepast voor de montage van propelers op modelvliegtuigjes.
Verder
blijkt het nuttig alle naaldveren, die op de fluit kleppen open houden, te
verwijderen. Ons mechanisme houdt de kleppen immers in rust open door de zwaartekracht,
aangezien we de fluit ondersteboven monteren en gebruiken, Dit komt de responssnelheid
en ook het energieverbruik erg ten goede. Voor de duimklep moeten we nog een
goede oplossing verzinnen. Op het uiteinde van de ankers bevestigden we stelringen,
voorlopig met binnenmaat 2.1 mm, te groot voor deze toepassing maar we vonden
geen leverancier voor stelringen met een gatmaat van 1.5 mm. De hier gebruikte
stelringen komen van Conrad (bestelnummer 144-313-02 of 1-995-913). Ze zijn
voorzien van een M3 stelboutje. Voor de grotere Ledex spoelen gebruikten we
Pichler 'prop-savers' normaal toegepast voor de montage van propelers op modelvliegtuigjes.
 De
duim-eenheid kan losgenomen worden, zoniet zou het verwijderen van de fluit
moeilijkheden kunnen opleveren. De mechanika van de automatisering van de
vingers is daarmee zo goed als rond.
De
duim-eenheid kan losgenomen worden, zoniet zou het verwijderen van de fluit
moeilijkheden kunnen opleveren. De mechanika van de automatisering van de
vingers is daarmee zo goed als rond.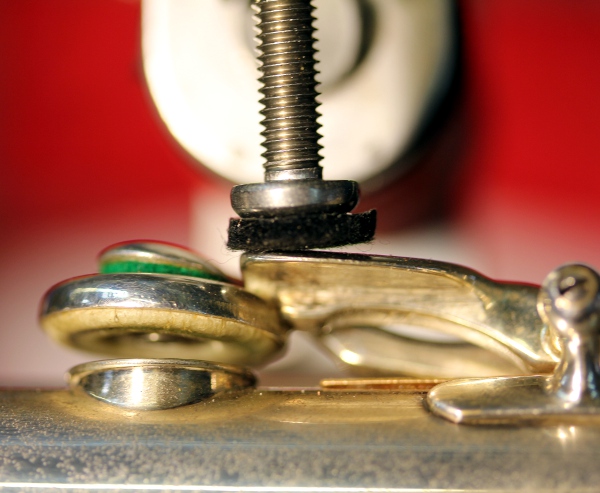 De uitgangen 12 en 13 zijn voorlopig nog onbestemd. Voedingmodules besteld:
24V / 8A voor de eindversterker en 12V / 13A voor de houdspanning van de solenoiden.
Deze modules kunnen in het 50 x 100 basisprofiel geschoven worden, wanneer
we eerst de as van het voorwiel wegnemen. Voor de nodige eindversterker kozen
we voor de TPA3116D2EVM, een digitale versterker die in de brug konfigureerden
(PBTL mode). Het vermogen in 8 ohm is dan 100 W, maar met onze 16 Ohm belasting
in kombinatie met de 24V voedingsspanning wordt dat beperkt tot minder dan
36 W.
De uitgangen 12 en 13 zijn voorlopig nog onbestemd. Voedingmodules besteld:
24V / 8A voor de eindversterker en 12V / 13A voor de houdspanning van de solenoiden.
Deze modules kunnen in het 50 x 100 basisprofiel geschoven worden, wanneer
we eerst de as van het voorwiel wegnemen. Voor de nodige eindversterker kozen
we voor de TPA3116D2EVM, een digitale versterker die in de brug konfigureerden
(PBTL mode). Het vermogen in 8 ohm is dan 100 W, maar met onze 16 Ohm belasting
in kombinatie met de 24V voedingsspanning wordt dat beperkt tot minder dan
36 W.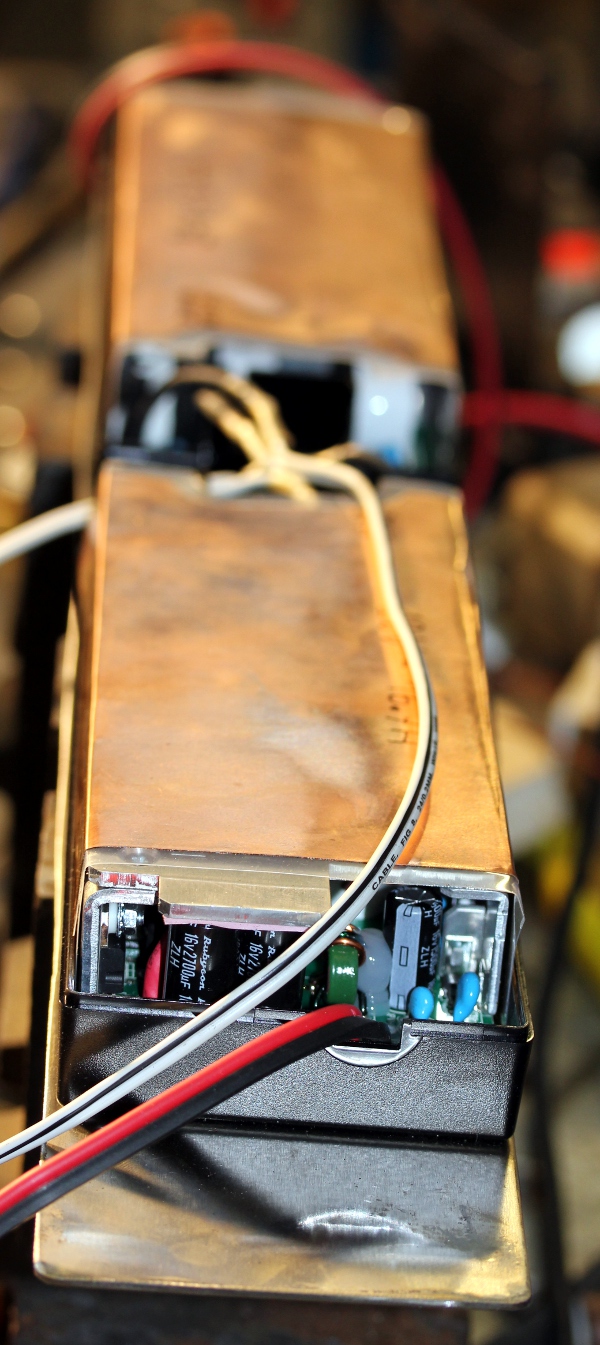 De IEC konnektor evenals
de aan/uit schakelaar moeten aan de achterkant (aanblaasuiteinde) gemonteerd
worden.
De IEC konnektor evenals
de aan/uit schakelaar moeten aan de achterkant (aanblaasuiteinde) gemonteerd
worden.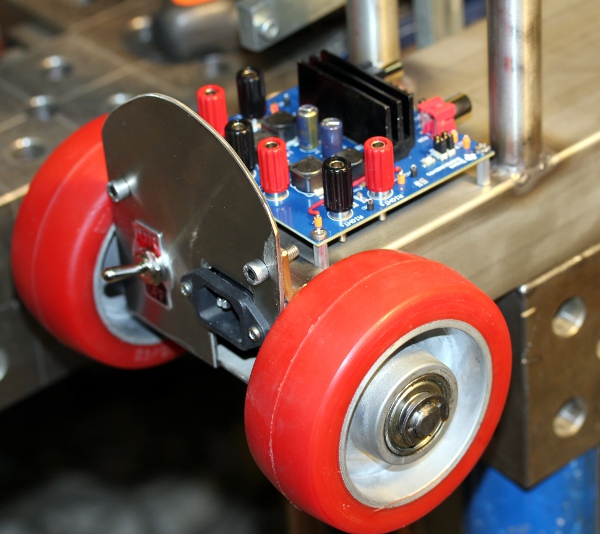 Achterwielen
gemonteerd en vastgezet met circlips op de as. Voedingen bedraad en in het
kokerprofiel geschoven.
Achterwielen
gemonteerd en vastgezet met circlips op de as. Voedingen bedraad en in het
kokerprofiel geschoven.
 Beide enkelzijdige
printjes zijn Eurocard formaat: 100 x 160 mm.Er
was een foutje in het printontwerp geslopen: pin 12 van de tweede multiplier
had een foutief baantje naar massa...Alle nodige onderdelen hadden we in voorraad,
behalve de 82 mH spoel: bijbesteld bij RS-Components, Bourns RLB0913-82 3K.
De voorraad OP27 chips is nu volledig uitgeput.
Herrekenen van het dynamisch formant filter op het toongenerator board: trimpot
toegevoegd voor de afregeling. Polykarbonaatplaat uitgezaagd voor de montage
van de PCB's. De hub print en de generator print komen aan de 'voorzijde'
(kant bespeler). De pulse/hold en de -12V voeding komen op de andere kant.
SMPS voeding (12V/5A) besteld bij Farnell: type TMM60112C van Traco. De PCB's
worden vastgezet met metalen MF M3 bussen van 10 mm. De moeren komen aan de
onderdelenzijde.
Beide enkelzijdige
printjes zijn Eurocard formaat: 100 x 160 mm.Er
was een foutje in het printontwerp geslopen: pin 12 van de tweede multiplier
had een foutief baantje naar massa...Alle nodige onderdelen hadden we in voorraad,
behalve de 82 mH spoel: bijbesteld bij RS-Components, Bourns RLB0913-82 3K.
De voorraad OP27 chips is nu volledig uitgeput.
Herrekenen van het dynamisch formant filter op het toongenerator board: trimpot
toegevoegd voor de afregeling. Polykarbonaatplaat uitgezaagd voor de montage
van de PCB's. De hub print en de generator print komen aan de 'voorzijde'
(kant bespeler). De pulse/hold en de -12V voeding komen op de andere kant.
SMPS voeding (12V/5A) besteld bij Farnell: type TMM60112C van Traco. De PCB's
worden vastgezet met metalen MF M3 bussen van 10 mm. De moeren komen aan de
onderdelenzijde. 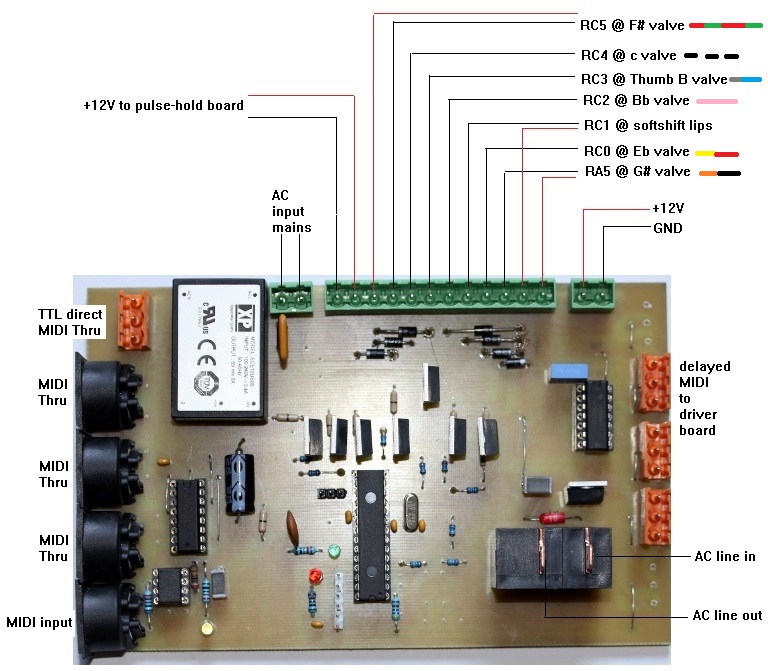
 Draadkleuren
gedokumenteerd in het bedradingsplan. Alle bedrading voor de netspanningen
afgewerkt met Wago konnektors.
Draadkleuren
gedokumenteerd in het bedradingsplan. Alle bedrading voor de netspanningen
afgewerkt met Wago konnektors.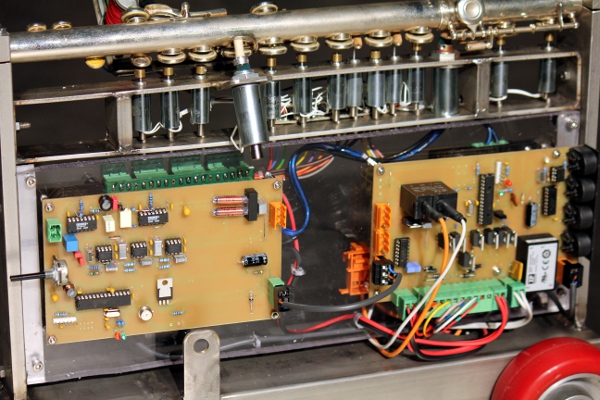
 Montage van de vier wielen.
Een eerste zicht op de robot, nog zonder de lipklep:
Montage van de vier wielen.
Een eerste zicht op de robot, nog zonder de lipklep: 
 De softshift magneet wordt vastgezet met twee UNC #3-48 moertjes, een Amerikaans
anakronisme... Na uitharding moet het membraan nog op de juiste maat worden
afgeknipt. Nu moeten
we wachten tot de siliconenrubber waarmee we het stukje membraan vastkleefden
uitgehard is, vooraleer we het membraan aan het anker van de elektromagneet
kunnen bevestigen. Wanneer de klep volledig gesloten is, kunnen we het naar
beneden uitgebreid toonbereik (noten 48 - 59) spelen. In rust is de klep altijd
geopend.
De softshift magneet wordt vastgezet met twee UNC #3-48 moertjes, een Amerikaans
anakronisme... Na uitharding moet het membraan nog op de juiste maat worden
afgeknipt. Nu moeten
we wachten tot de siliconenrubber waarmee we het stukje membraan vastkleefden
uitgehard is, vooraleer we het membraan aan het anker van de elektromagneet
kunnen bevestigen. Wanneer de klep volledig gesloten is, kunnen we het naar
beneden uitgebreid toonbereik (noten 48 - 59) spelen. In rust is de klep altijd
geopend.  Er moet wel nog een ophangbeugel worden gelast bovenaan de boordringen en
op het nog exact te bepalen zwaartepunt van de robot.
Er moet wel nog een ophangbeugel worden gelast bovenaan de boordringen en
op het nog exact te bepalen zwaartepunt van de robot. Met
72 tot 98 zijn we al erg tevreden... ADSR implementatie volledig opnieuw geschreven,
deze keer met een vaste sampling rate. (ADSR_Period, in the source kode).
Na een cold-boot moet 2 seconden gewacht worden vooraleer midi-kommando's
verstuurd kunnen worden. Die tijd is nodig voor de 24EP128MC202 processor
om al de golfvormlookup tabellen te berekenen. Na een power-off kommando volstaat
een wachttijd van maksimaal 1 sekonde.
Met
72 tot 98 zijn we al erg tevreden... ADSR implementatie volledig opnieuw geschreven,
deze keer met een vaste sampling rate. (ADSR_Period, in the source kode).
Na een cold-boot moet 2 seconden gewacht worden vooraleer midi-kommando's
verstuurd kunnen worden. Die tijd is nodig voor de 24EP128MC202 processor
om al de golfvormlookup tabellen te berekenen. Na een power-off kommando volstaat
een wachttijd van maksimaal 1 sekonde.  Merk
op dat elke individuele periode substantieel verschillend is en dat de frekwentie
in enige mate onstabiel is, iets wat heel wat wetenschappers over het hoofd
zien en wat ook op een oscilloskoop nauwelijks valt waar te nemen.
Merk
op dat elke individuele periode substantieel verschillend is en dat de frekwentie
in enige mate onstabiel is, iets wat heel wat wetenschappers over het hoofd
zien en wat ook op een oscilloskoop nauwelijks valt waar te nemen.
Maintenance notes . Aantekeningen met betrekking tot onderhoud en herstellingen.
1.- Indien iets mis gaat met de +24V voeding of de +12V voeding, moeten die uit het basiskokerprofiel verwijderd worden. Om dit te doen moeten de voorwielen en de 12 mm as waarop ze draaien volledig worden weggenomen. Aan de achterzijde moeten de faston konnektors aan de hoofdschakelaar evenals de konnektors naar de versterkervoeding (rood/zwart) worden losgemaakt. Die plaat is met twee M5 bouten op het chassis bevestigd. Ook de aansluitingen voor de 230V en de 12V voeding moeten losgemaakt worden van de PCB's. Pas dan kan de plaat waarop de voedingen zijn gemonteerd losgenomen worden. De zwart/witte draad ligt aan de nulleider, de witte aan de faze. De voedingen zelf zijn niet geaard, het chassis dat ze volledig omhult wel.
References:
Kostprijsberekening:
Materialen:
| Omschrijving / item | aantal | kost per stuk | opmerkingen | subtotaal |
| Dwarsfluit | 1 | schenking Lara Van Wynsberghe |
pm
|
|
| Ledex solenoids, 12V STA195203-234 | 15 | 18.00 | uit voorraad |
270.00
|
| Padu membraan kompressor | 1 | uit voorraad (radioHome) |
100.00
|
|
| Rood koper | 1 kg | uit voorraad (Demar) |
30.00
|
|
| Messing staaf, diam. 22mm | 1 kg | uit voorraad (Demar) |
25.00
|
|
| Eindversterkers | 3 | ingekocht: Farnell |
442.68
|
|
| Inox, plat 50 x 10 | uit voorraad (Demar) |
14.00
|
||
| Inox, plat 30 x 3 | uit voorraad (Demar) |
12.00
|
||
| Inox, plat 25 x 3 | 400 mm | uit voorraad (Demar) |
8.00
|
|
| Inox, koker 100 x 50 x 2 | 850 mm | uit voorraad (Demar) |
25.00
|
|
| Inox beugels, 50mm, 5mm dik | 2 | uit voorraad |
10.00
|
|
| Inox buis 20 mm, dikte 3mm | 600 mm | uit voorraad (Demar) |
9.00
|
|
| M12 draadstang inox | uit voorraad (Fabory) |
25.00
|
||
| 12 mm as | 1 m | uit voorraad |
30.00
|
|
| wielen, rood met kogellagers | 4 | 30.00 | uit voorraad |
120.00
|
| circlips voor 12 mm as | 4 | 0.50 | uit voorraad |
2.00
|
| Ledex softshift solenoid | 1 | uit voorraad (Saia-Burgess) |
220.00
|
|
|
Ledexsolenoids, 12V STA195205-230 |
2 | uit voorraad |
96.00
|
|
| Asborgringen met M3 stelschroef, 2.1mm | 10 | uit voorraad ( Conrad) |
31.00
|
|
| As stelringen, aluminium, 3 mm, Pichler | 2 | uit voorraad ( Conrad) |
9.00
|
|
| Viltringen | uit voorraad |
2.00
|
||
| Laukhuff traktuurmagneet | 1 | uit voorraad |
37.00
|
|
| Voeding 24V - 8A XP-power | 1 | ingekocht: Farnell |
117.00
|
|
| Voeding 12V - 16A XP-Power | 1 | ingekocht: Farnell |
117.00
|
|
| Voeding 12V - 5A Traco | 1 | ingekocht Farnell |
105.00
|
|
| Midi-hub board - populated | 1 |
380.00
|
||
| Pulse-hold board - populated | 1 | uit voorraad |
360.00
|
|
| Waveform generator board | 1 |
500.00
|
||
| Multipliers AD734 | 3 | RS components |
105.00
|
|
| 12V LED lampjes, 1.5W, Sencys G4,110 lumen. | 4 | uit voorraad (Brico) |
26.00
|
|
| Boordringen inox | 2 | uit voorraad (Demar-Lux) |
55.00
|
|
| M10 x 30 of 20 inox bouten en moeren | uit voorraad (Fabory) |
40.00
|
||
| Kobalt zaagblad 250x2x32 Z160T5 P341202 | Welda |
160.00
|
totale materiaalkost: 3480.70 Euro
Werklast:
| data | uren | kost | subtotaal |
| 04.01.2020 | 4 |
180.00
|
|
| 05.01.2020 | 2 |
90.00
|
|
| 06.01.2020 | 14 |
630.00
|
|
| 07.01.2020 | 9 |
405.00
|
|
| 08.01.2020 | 10 |
450.00
|
|
| 09.01.2020 | 6 |
270.00
|
|
| 10.01.2020 | 10 |
450.00
|
|
| 11.01.2020 | 9 |
405.00
|
|
| 12.01.2020 | 8 |
360.00
|
|
| 13.01.2020 | 9 |
405.00
|
|
| 14.01.2020 | 8 |
360.00
|
|
| 15.01.2020 | 10 |
450.00
|
|
| 16.01.2020 | 9 |
405.00
|
|
| 17.01.2020 | 9 |
405.00
|
|
| 18.01.2020 | 6 |
270.00
|
|
| 19.01.2020 | 8 |
360.00
|
|
| 20.01.2020 | 4 |
180.00
|
|
| 21.01.2020 | 5 |
225.00
|
|
| 22.01.2020 | 2 |
90.00
|
|
| 23.01.2020 | 10 |
450.00
|
|
| 24.01.2020 | 6 |
270.00
|
|
| 25.01.2020 | 8 |
360.00
|
|
| 26.01.2020 | 6 |
270.00
|
|
| 27.01.2020 | 7 |
315.00
|
|
| 28.01.2020 | 10 |
450.00
|
|
| 29.01.2020 | 14 |
630.00
|
|
| 30.01.2020 | 10 |
450.00
|
|
| 31.01.2020 | 9 |
405.00
|
|
| 01.02.2020 | 10 |
450.00
|
|
| 02.02.2020 | 8 |
360.00
|
|
| 03.02.2020 | 8 |
360.00
|
|
| maand januari |
11160.00
|
||
| 04.02.2020 | 9 |
405.00
|
|
| 05.02.2020 | 8 |
360.00
|
|
| 10.12.2020 | 8 |
360.00
|
|
| 11.12.2020 | 8 |
360.00
|
|
| 12.12.2020 | 4 |
180.00
|
arbeidskost: 12.825 Euro
End cost 12.2020: 16.306 Euro
Estimated end cost: 16.500 Euro.
